
Wazuh Provisioning Workflow on MTN Cloud
Overview
This guide covers the end to end provisioning of a Wazuh instance, delivered as the MTN SIEM Service, on the MTN Cloud Platform. It provides step by step instructions for user creation, Security Group configuration, instance deployment and first login to the Wazuh dashboard.
Why it matters:
- Centralised Security Monitoring: Wazuh collects events and alerts from the servers you monitor and stores them on a dedicated data disk.
- Controlled Access: A dedicated Security Group lets you restrict dashboard administration and agent traffic to only the addresses you trust.
- Single Node Deployment: The Wazuh manager, indexer and dashboard are deployed together on one instance from the service catalog.
- Scalable Retention: The data volume can be sized to match your number of agents and retention needs.
Prerequisites
Before you begin, ensure you have:
- An active MTN Cloud Console login with the appropriate permissions to view the Infrastructure and Provisioning tabs.
- A created Resource Pool (Project).
- A created Network.
- A created Router (if required) with the network from the previous prerequisite attached.
- A planned deployment strategy, including:
- Resource specifications (CPU, RAM, storage).
- Target network for the instance.
- IP addressing requirements.
- Required inter communication and associated Security Group rules.
- Whether a floating IP is needed.
Tip: If you do not see your networks or Security Groups when provisioning, refresh the portal or contact support.
Minimum System Requirements
The values below are the published minimums for a single node Wazuh all in one deployment (Wazuh manager, indexer and dashboard in one instance). On MTN Cloud, select a Plan and Volume that meet or exceed these figures. The recommended MTN catalog plan is shown for convenience.
- vCPU: 4 vCPU (minimum); 8 vCPU for 25 or more agents.
- Memory (RAM): 8 GB (minimum).
- Disk storage: 160 GB total, being a 100 GB data volume (minimum) plus a 60 GB root volume added automatically.
- MTN Catalog Plan: G4S8 (4 vCPU / 8 GB).
- Interfaces: 1 interface (management).
Important Note: Wazuh stores all collected events, alerts and its indexed data on a dedicated data disk, which is why the data volume you select carries the retention load. The root volume is fixed at 60 GB by the platform and holds the operating system and the Wazuh manager itself; you do not select it. Size the data volume to your expected retention needs; higher event rates and longer retention require more disk. As a guide, 100 GB suits up to 25 agents at 90 day retention, 200 GB suits 25 to 50 agents, and 400 GB suits 50 to 100 agents.
The Right Sequence
To deploy Wazuh efficiently, follow this sequence:
- Create a User (Linux/Windows): Add the required user under User Settings.
- Define Security Groups: Create a new Security Group specifying the ports needed for ingress and egress traffic. This Security Group can be appended to the Wazuh instance (in addition to the default) after the instance has been created. The default Security Group provides basic functionality such as console access and instance health checks, and it is highly recommended that you use it during creation.
- Provision the Wazuh Instance: Deploy the instance, attach it to the appropriate network you have created, assign a floating IP, and apply the default Security Group. After provisioning, your defined or additional Security Group(s) can be added to the instance.
Phase 1: Create Linux/Windows User
Purpose: Allow logins to instances provisioned via the console, and manage resource ownership within the MTN Cloud Platform. Complete this phase only if it has not already been done.
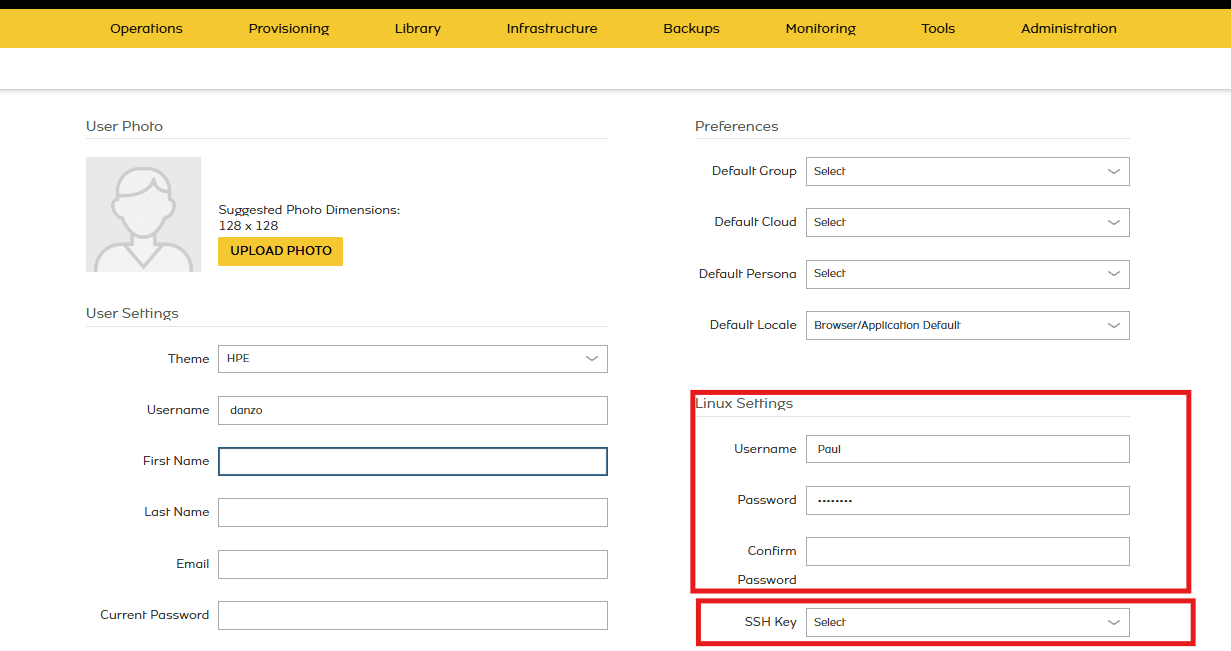
Step 1: Navigate to User Settings
Log in to your user account and navigate to User Settings by clicking the dropdown beside your name at the top right corner of the screen.

Step 2: Configure User Credentials
Locate the Linux Settings section and assign the following:
- Username: Enter a username.
- Password: Enter a password.
- Confirm Password: Re enter the password to confirm.
- SSH Key: Optionally, select an SSH key entry if you have one.
Repeat the same process for your Windows Settings. Once all details are entered, scroll to the bottom of the page and click Save.
Phase 2: Define Security Groups
Purpose: Control network access to (ingress) and from (egress) your Wazuh instance. Complete this phase only if a suitable Security Group does not already exist.
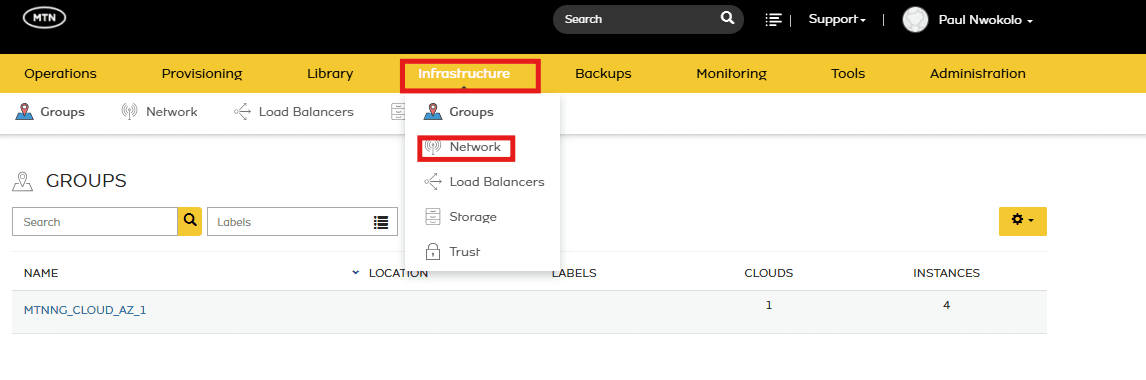
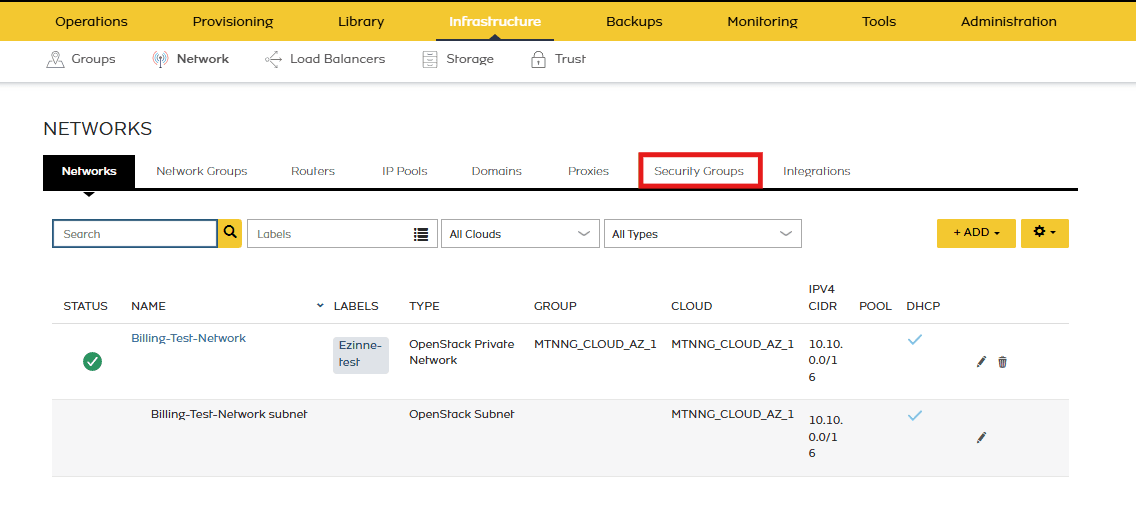
Step 1: Navigate to Security Groups
Navigation: Infrastructure > Network > Security Groups
Step 2: Create the Security Group
- Click + Add.
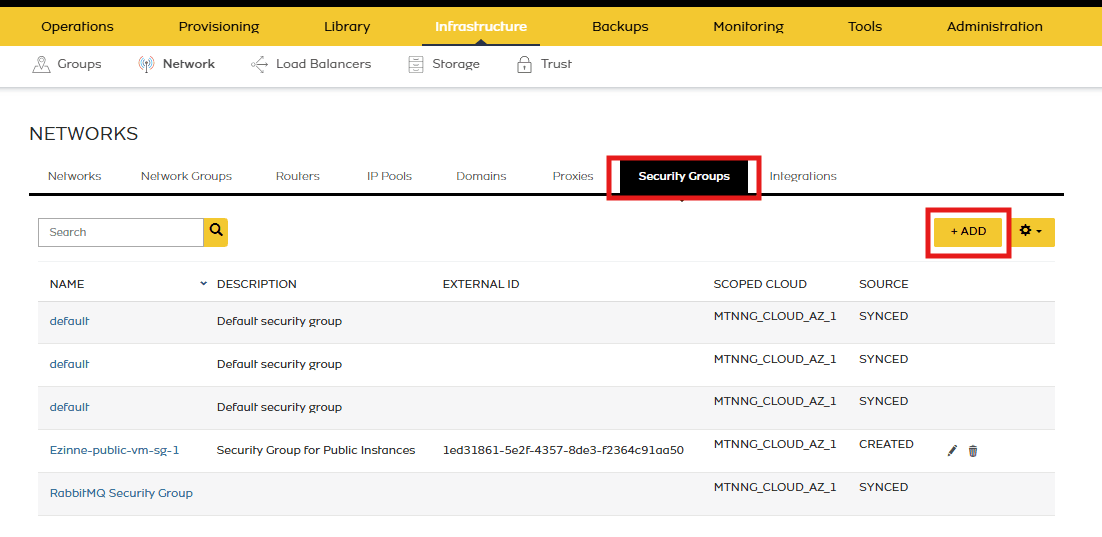
- Assign the following:
- Name
- Description
- Scoped Cloud: MTNNG_CLOUD_AZ_1
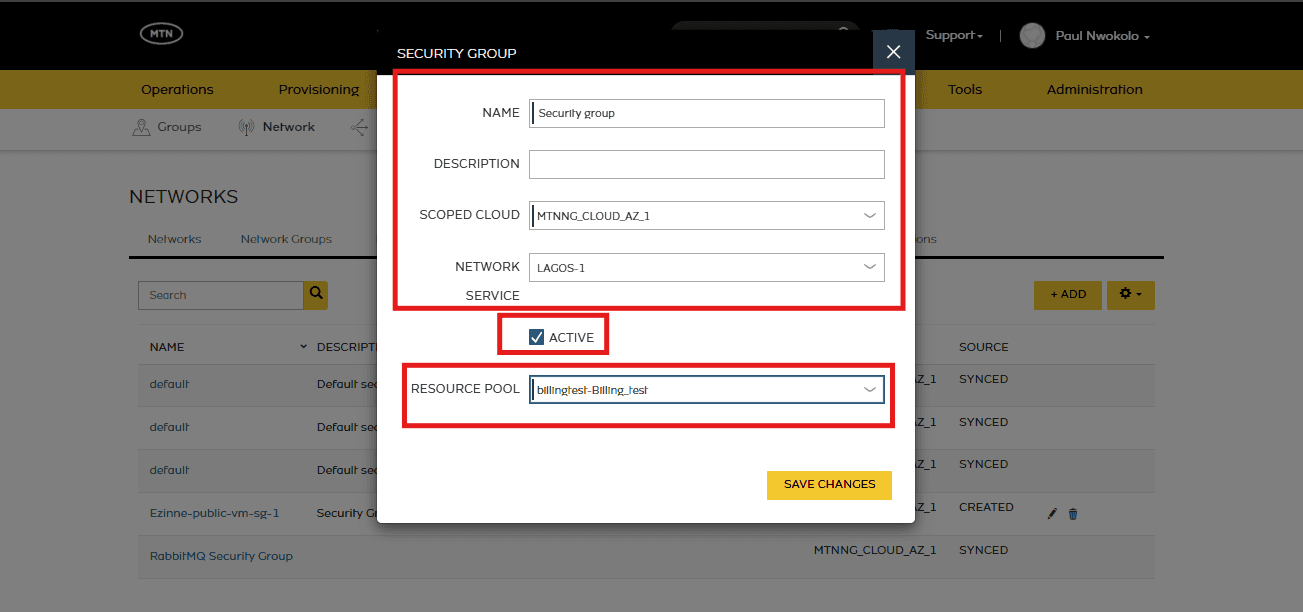
Step 3: Add Security Group Rules
- Click the Security Group you just created, then navigate to Rules.
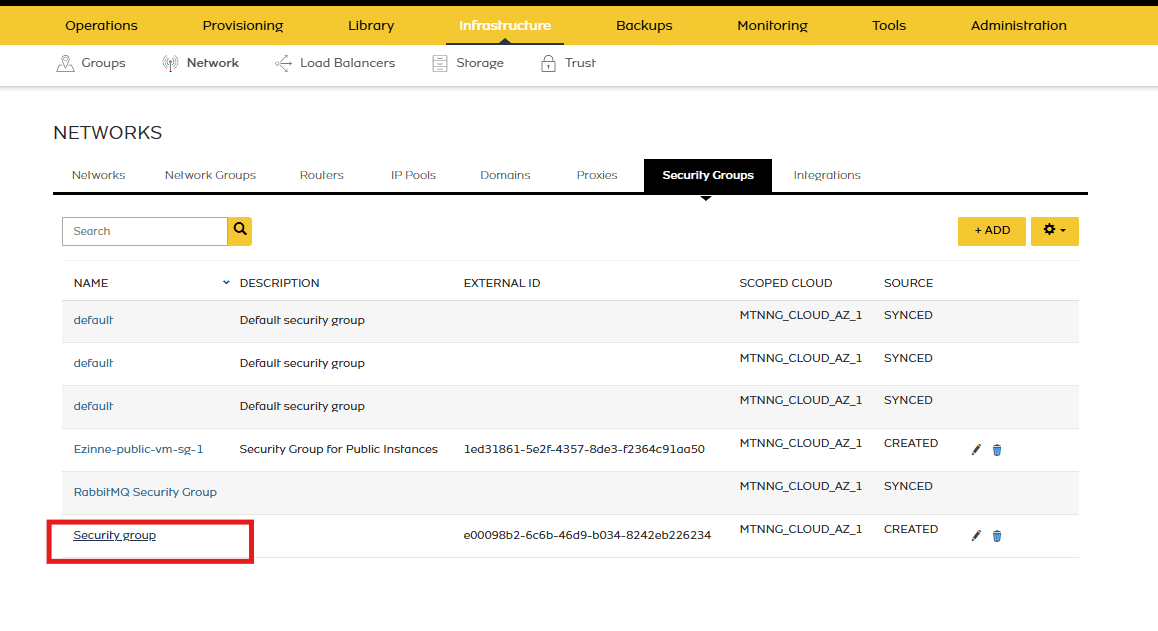
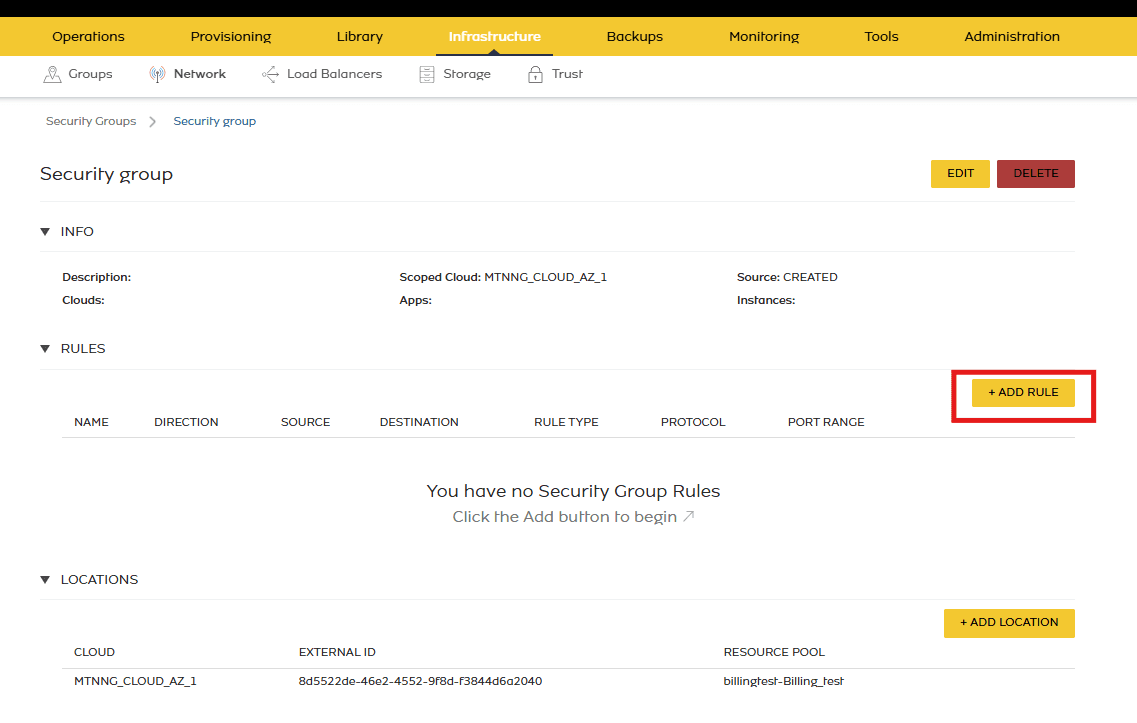
- Click + Add Rule and assign the following:
- Name
- Direction: Ingress or Egress
- Rule Type: Custom Rule
- Protocol: TCP, UDP or ICMP
- Port Range: Available depending on the protocol selected
- Source Type / Source
- Destination Type / Destination Port Range
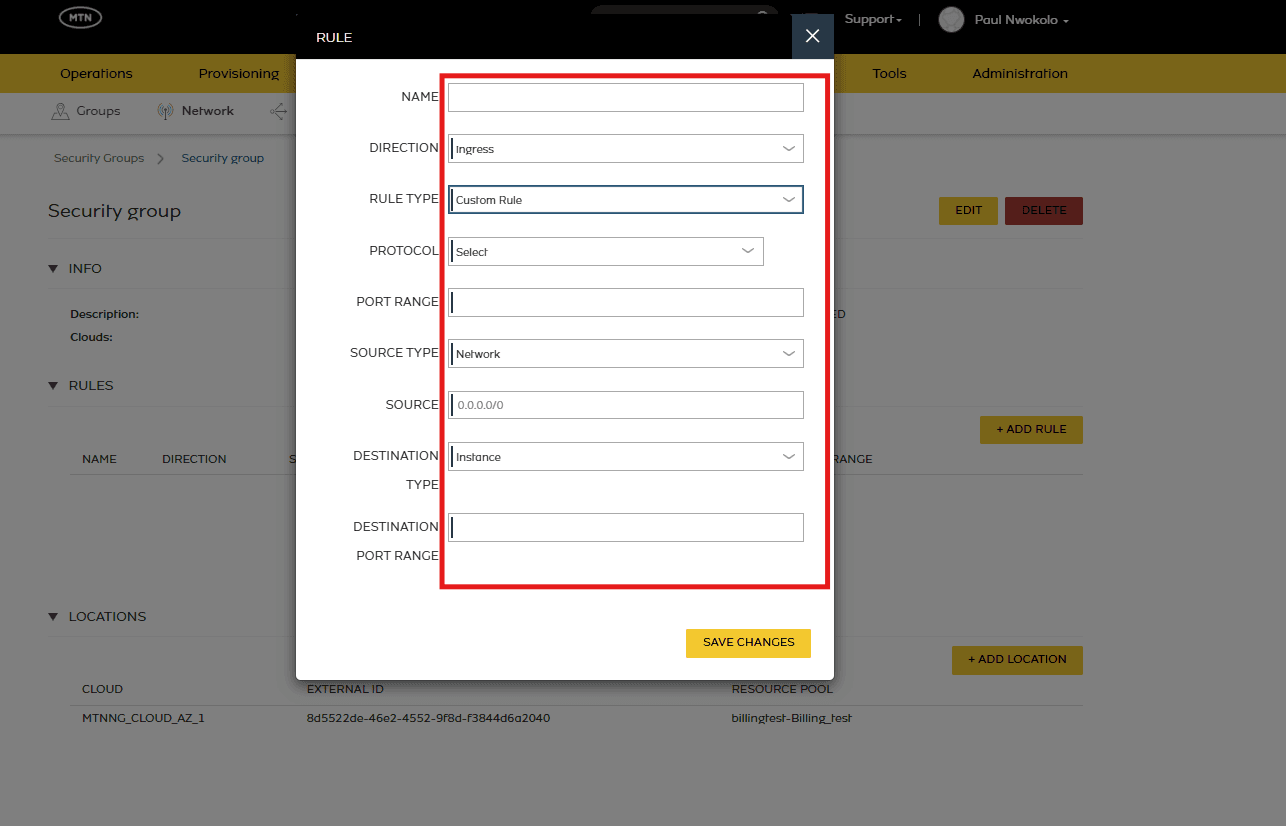
- Scroll down and click Save Changes.
- Navigate to Location, click + Add Location, select the required Cloud where the workload to be protected is provisioned, and click Save Changes.
Use Case: Restricting Dashboard Access to Only My Laptop
Scenario: You want only your laptop (with IP 200.200.113.15) to be able to administer your Wazuh instance, while your monitored servers on 10.53.53.0/24 can still send their event data. All other devices should be blocked.
- Navigate to Infrastructure > Network > Security Groups.
- Click + Add and assign the following:
- Name: Wazuh-Restricted-Access
- Description: Allow administration from my laptop and agent traffic from my server network
- Scoped Cloud: MTNNG_CLOUD_AZ_1
- Select the Wazuh-Restricted-Access group.
- Go to the Rules tab, then click + Add Rule to add Allow-SSH-From-Laptop: Direction Ingress, Rule Type Custom Rule, Protocol TCP, Port Range 22, Source Type Network, Source 200.200.113.15/32 (your laptop’s public IP), Destination Type Instance, Destination Port Range 22. Click Save Changes.
- Add Allow-Dashboard-From-Laptop: Direction Ingress, Rule Type Custom Rule, Protocol TCP, Port Range 443, Source Type Network, Source 200.200.113.15/32, Destination Type Instance, Destination Port Range 443. Click Save Changes.
- Add Allow-Agent-Data-From-Servers: Direction Ingress, Rule Type Custom Rule, Protocol TCP, Port Range 1514, Source Type Network, Source 10.53.53.0/24 (the network hosting your monitored servers), Destination Type Instance, Destination Port Range 1514. Click Save Changes.
- Add Allow-Agent-Enrolment-From-Servers: Direction Ingress, Rule Type Custom Rule, Protocol TCP, Port Range 1515, Source Type Network, Source 10.53.53.0/24, Destination Type Instance, Destination Port Range 1515. Click Save Changes.
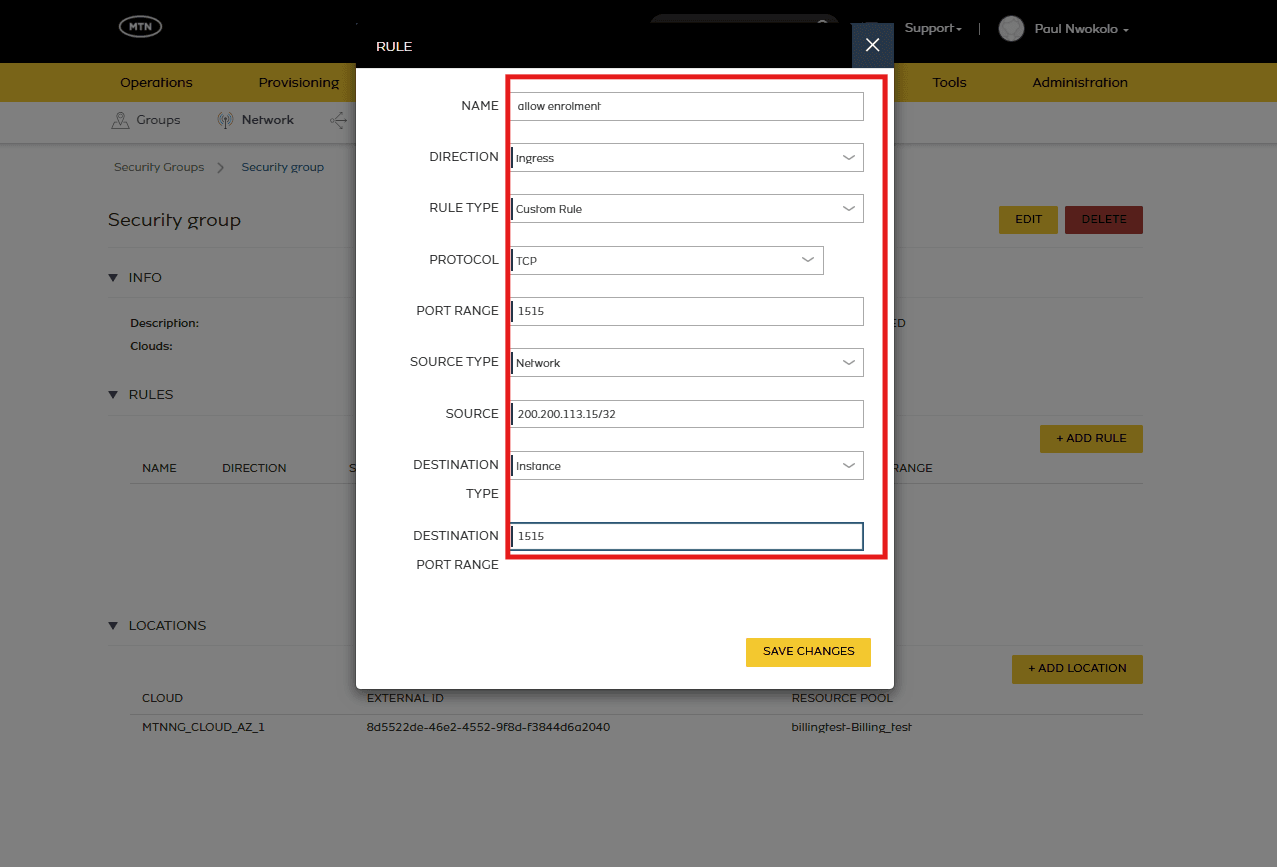
- Add Allow-ICMP: Direction Ingress, Rule Type Custom Rule, Protocol ICMP, Source Type Network, Source 200.200.113.15/32, Destination Type Instance. Click Save Changes.
- Attach the Wazuh-Restricted-Access group to your Wazuh instance in addition to the default Security Group.
Result: Only your laptop can administer the Wazuh instance, and only your own server network can enrol agents and send event data. All other attempts are denied.
Phase 3: Provision the Wazuh Instance
Purpose: Deploy a Wazuh instance in the MTN Cloud Console once your Security Group and network are ready.
Step 1: Select the Catalog Item
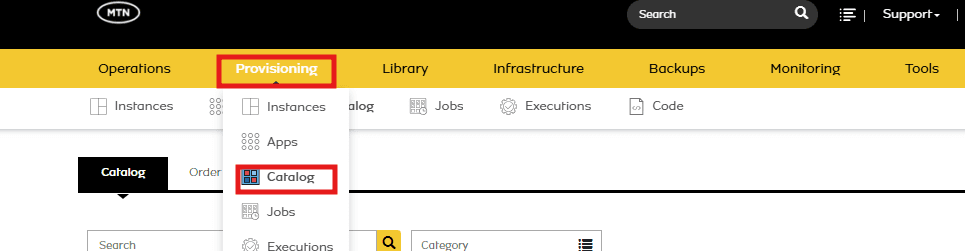
- Navigate to Provisioning > Catalog.
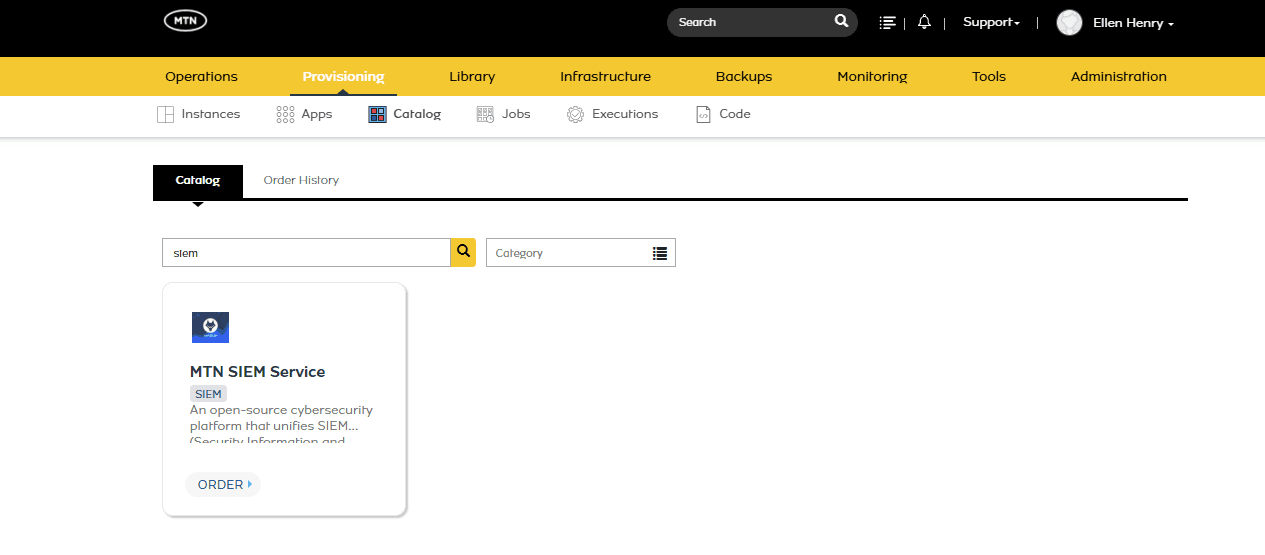
- Search for and click MTN SIEM Service.
Step 2: Complete the Order Form
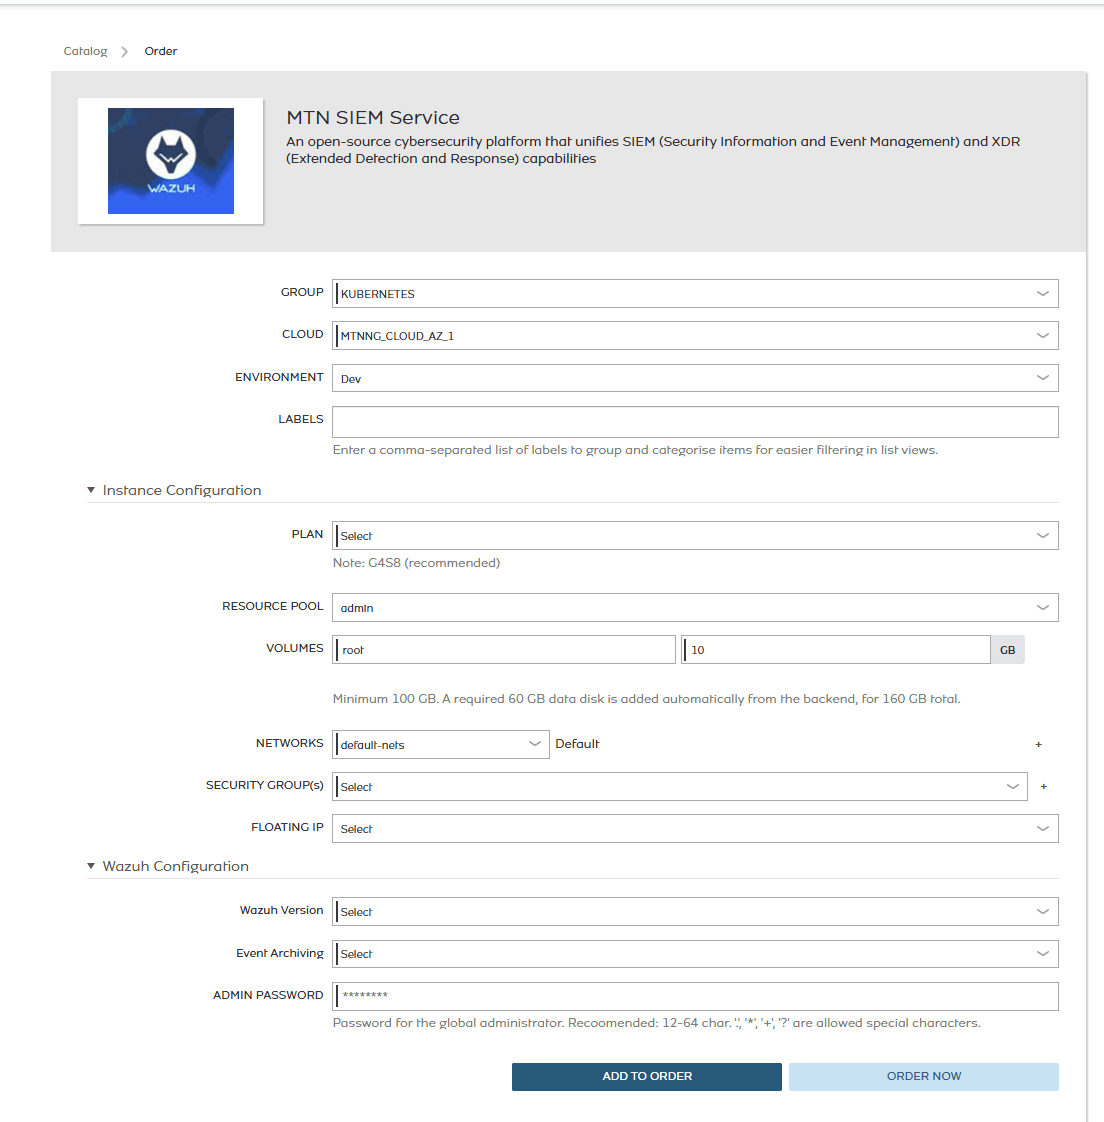
Complete the form as follows:
- Select the Group and Cloud where the Wazuh instance will be deployed (e.g., MTNNG_CLOUD_AZ_1).
- Choose the appropriate Environment (e.g., Development, Staging, Production).
- Select a Plan that meets the minimum CPU and memory requirements (minimum 4 vCPU and 8 GB RAM; G4S8 recommended).
- Select the required Volume capacity (minimum 100 GB). A 60 GB root disk is added automatically by the platform, giving 160 GB in total.
- Select the Resource Pool (Project) you created.
- From the list, select any Network you have created.
- Assign a Floating IP based on the router selection made for the chosen network.
- Apply the Default Security Group first, then add the Security Group you created.
- Select the Wazuh Version you want installed.
- Select the Event Archiving option.
- Enter your Admin Password (see Admin Password Rules below).
Step 3: Launch and Monitor
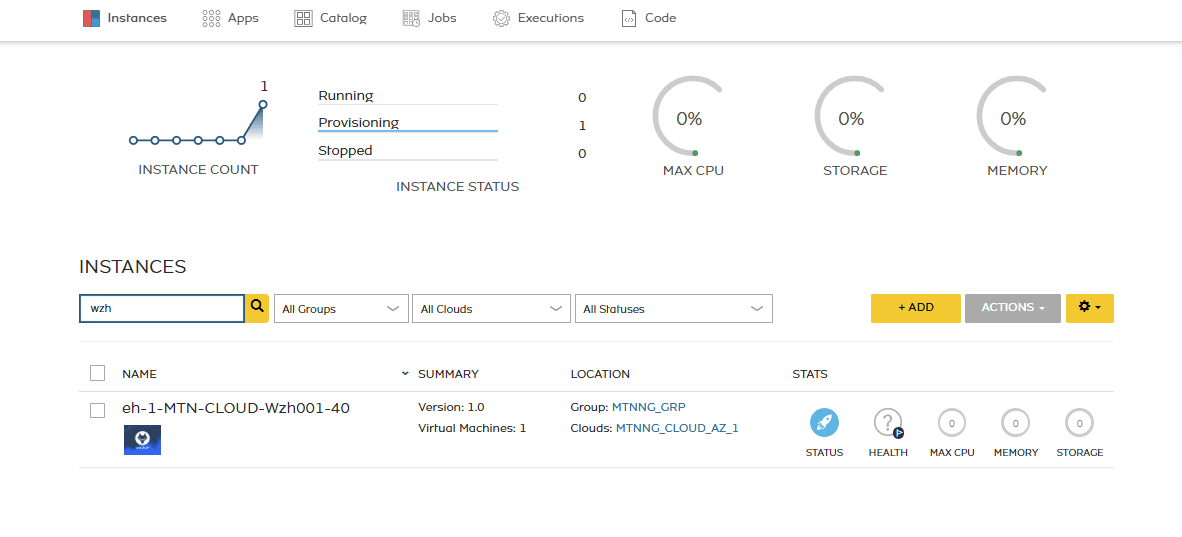
Click Order Now to launch. MTN Cloud will begin provisioning and will display the instance status once deployment is complete.
Admin Password Rules
The password you choose must satisfy all of the following, or the order will be rejected:
- Between 12 and 64 characters.
- At least one uppercase letter, one lowercase letter and one digit.
- At least one of these symbols: . * + ? -
- No other symbols. Characters such as ! @ # $ % & are not accepted and will cause the order to fail.
Phase 4: First Login to the Dashboard
Purpose: Access the Wazuh dashboard for the first time. Provisioning takes approximately 20 to 30 minutes; the instance status in the console will show when deployment is complete.
Step 1: Open the Dashboard
Open a browser and navigate to https://<your-floating-ip>.

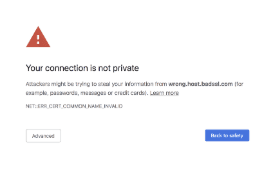
Step 2: Accept the Certificate Warning
You will see a certificate warning. This is expected, because the installation generates a self signed certificate. Select Advanced, then Proceed.
Step 3: Log In
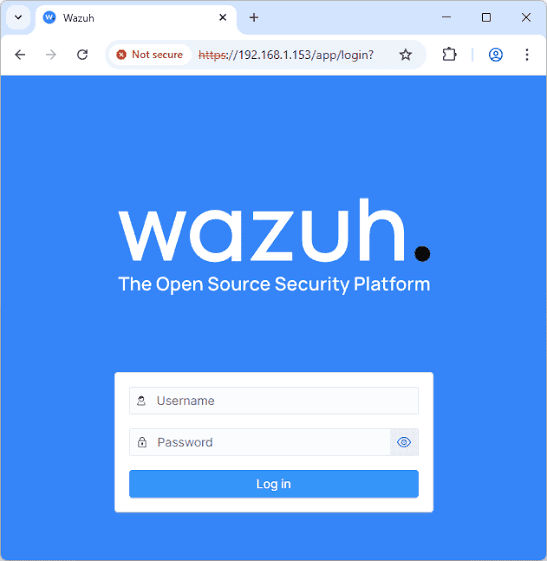
Log in with:
- Username: admin (lowercase)
- Password: the Admin Password you supplied on the order form
Note: If no password was set, a strong password was generated automatically during installation. If the Admin Password field was left blank, retrieve it by opening the instance in the MTN Cloud console, selecting the History tab, and reading the deployment summary printed by the provisioning task. It is also stored on the instance at /root/.wazuh-deploy-secrets.
Values to Record After Provisioning
Open the instance in the console, select History, and open the provisioning task output. Record the following values, as you will need all three when deploying agents:
- Manager address: The floating IP assigned to the instance (or the private IP if your monitored servers are on the same network).
- Wazuh version: Shown in the deployment summary. Your agents must match it exactly.
- Agent enrolment password: Shown in the deployment summary, and stored on the instance at /root/.wazuh-deploy-secrets.
Deploy Agents to the Servers You Want to Monitor
A Wazuh instance collects nothing until agents are installed on your servers and enrolled with the manager.
Final Notes
- Documentation: Keep a record of IPs, credentials, the Wazuh version and the agent enrolment password.
- Security Groups: Regularly review and update rules to follow the principle of least privilege. Never expose ports 9200 or 55000.
- Version Consistency: Agents must run the same version as the manager. Upgrade the manager before upgrading any agent, and never allow automatic updates to change either independently.
- Retention: Monitor disk usage on the data volume as your agent count grows. Increasing the data volume is the supported way to extend retention.
- Reusability: You may reuse the Security Groups and username/password for subsequent installations based on your security considerations.