
FortiADC (BYOL) Provisioning Workflow on MTN Cloud
Overview
This guide covers the automated deployment of a FortiADC (Application Delivery Controller) instance on the MTN Cloud Platform using the Bring Your Own License (BYOL) model. FortiADC provides advanced load balancing, application acceleration, and security capabilities for your critical applications.
Why it matters:
- Application Delivery Optimization: FortiADC provides intelligent load balancing, SSL offloading, and application acceleration to ensure optimal performance and availability of your applications.
- Enhanced Security: Includes advanced security features such as web application firewall (WAF), DDoS protection, and SSL/TLS inspection to protect your applications from threats.
- Flexible Licensing: The BYOL model allows you to leverage your existing Fortinet licenses, providing cost flexibility and integration with your existing Fortinet infrastructure.
- High Availability: Supports active-passive and active-active clustering configurations to ensure application continuity and minimize downtime.
- Comprehensive Management: Access both a Web-based GUI and CLI for administration, monitoring, and troubleshooting.
Prerequisites
Before you begin, ensure that you have:
- An active MTN Cloud Console login with appropriate permissions to view the Provisioning and Infrastructure tabs.
- A Resource Pool (Project) already created.
- A Network already created.
- A Router already created with the network attached.
- A pre-configured Security Group to manage inbound/outbound traffic.
- A valid FortiADC license key or a FortiCloud free-trial license for initial activation.
- A planned deployment strategy, including:
- Resource specifications (CPU, RAM, storage).
- Target network for the instance.
- IP addressing requirements.
- Required inter-communication and associated Security Group rules.
- Whether a floating IP is needed.
Tip: If you do not see your networks or Security Groups during provisioning, refresh the portal or contact support.
Important Note: You must include inbound rules in your Security Group for the ports required by FortiADC (for example Port 22 for SSH, Port 443 for Management GUI, and Port 161 for SNMP) to ensure the service is accessible.
Minimum System Requirements
The values below are Fortinet’s official published minimums for FortiADC-VM (8.0). On MTN Cloud, select a Plan and Volume that meet or exceed these figures.
- vCPU: 2 vCPU (minimum; 1 to 32 supported by license).
- Memory (RAM): 4 GB (image default and minimum; increase for higher L4/L7 loads).
- Disk Storage: At least 32 GB base (boot + data disk); size up for logging.
- MTN Catalog Plan: G8S32 (8 vCPU / 32 GB) or a smaller plan meeting the minimum.
- Interfaces: 1 interface minimum (FortiADC supports up to 10).
Phase 1 - Create Linux/Windows User
Purpose: Configure user credentials that will be used to access the FortiADC instance via the console.
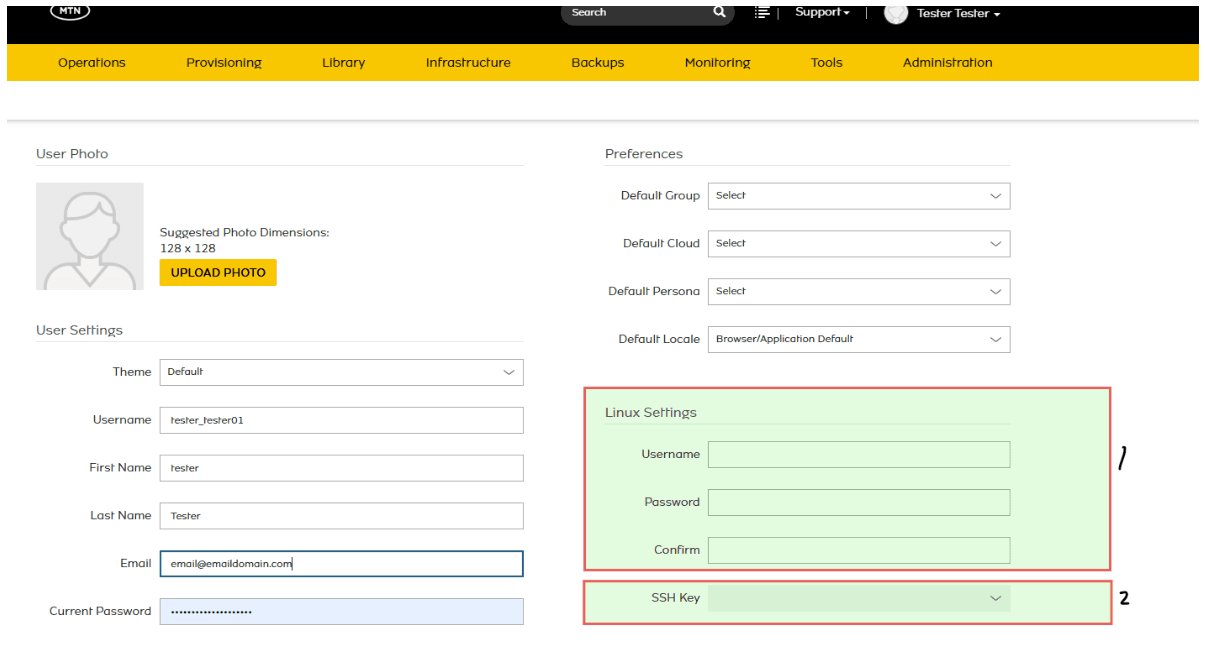
Navigate to User Settings
Navigate to User Settings by clicking the dropdown beside your name at the top-right corner of the screen.

Configure User Credentials
Locate the Linux Settings section and assign the following:
- Username: Enter a username for Linux access.
- Password: Enter a strong password.
- Confirm Password: Re-enter the password to confirm.
- SSH Key: Optionally, select an existing SSH key pair if you have one configured.
Repeat the same process for your Windows Settings if required. Once all details are entered, scroll to the bottom of the page and click Save.
Phase 2 - Define Security Groups
Purpose: Control network access to (ingress) and from (egress) your FortiADC instance.
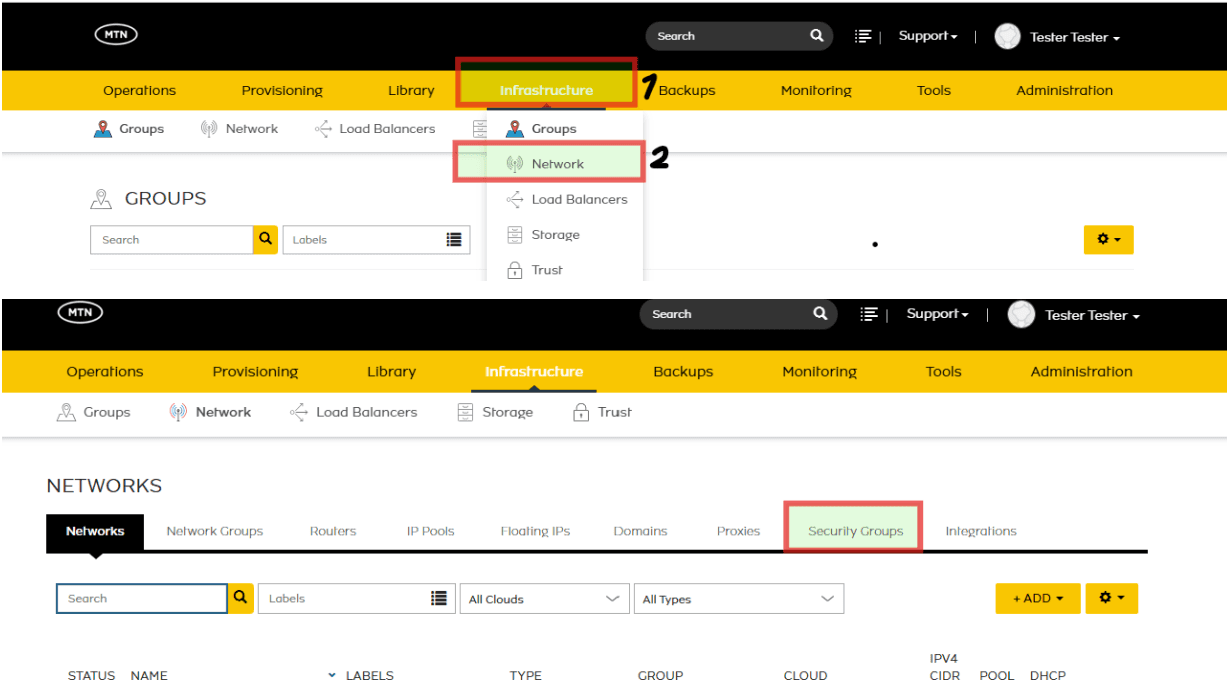
Navigate to Security Groups
Navigate to Infrastructure > Network > Security Groups.
Create Security Group
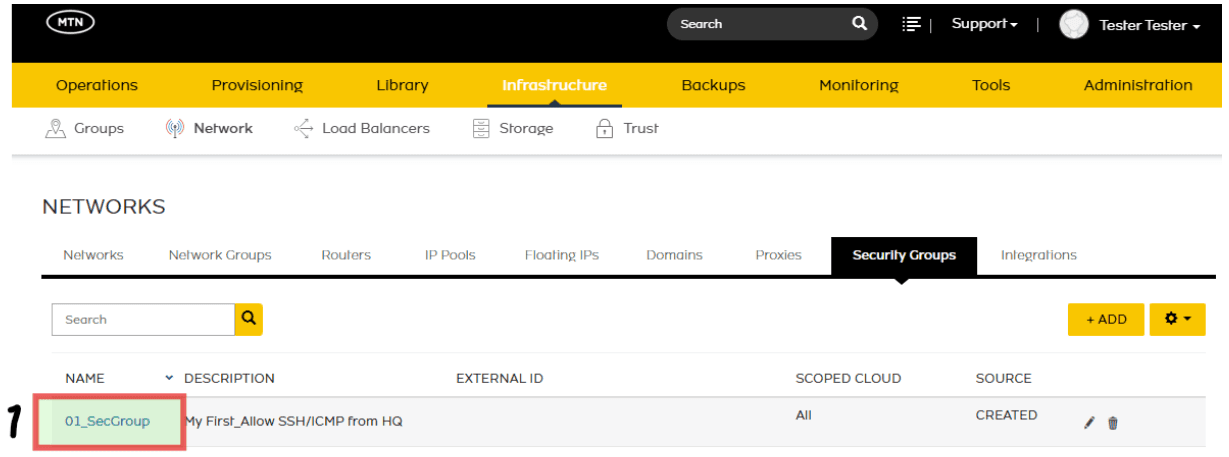
Click + Add and assign the following details:
- Name: Enter a descriptive name for your Security Group (for example, fortiadc-sg).
- Description: Provide a brief description of the group’s purpose.
- Scoped Cloud: Select the appropriate cloud (for example, MTNNG_CLOUD_AZ_1).
Configure Security Group Rules
- Click on the newly created Security Group.
- Navigate to the Rules tab.
- Click + Add Rules and assign the following:
- Name: Enter a descriptive rule name.
- Direction: Select either Ingress (inbound) or Egress (outbound).
- Rule Type: Select Custom Rule.
- Protocol: Choose TCP, UDP, or ICMP.
- Port Range: Specify the port range (for example, 22 for SSH, 443 for HTTPS).
- Source Type: Define the source (for example, Network, IP, or Security Group).
- Source: Enter the source IP or CIDR range.
- Destination Type: Define the destination.
- Destination Port Range: Specify the destination port range.
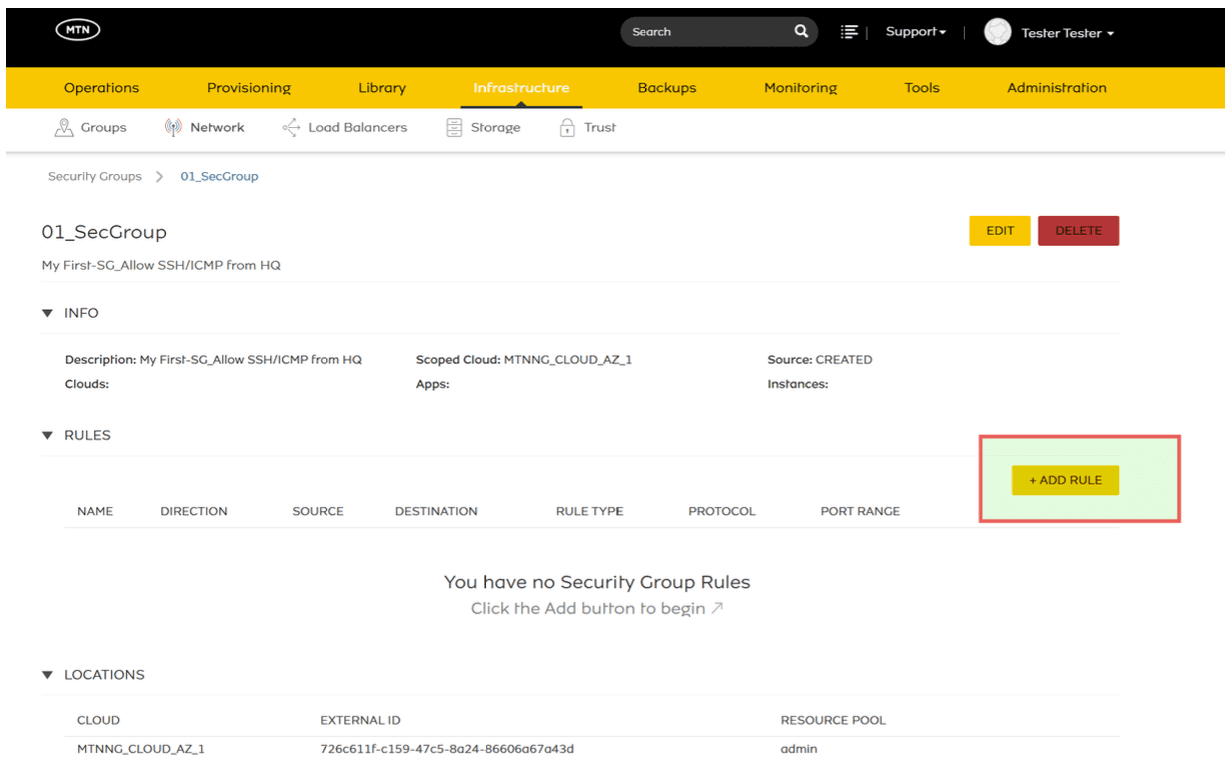
- Scroll down and click Save Changes.
- Navigate to the Location tab, click + Add Location, and select the cloud where the workload will be provisioned.
- Click Save Changes.
Use Case - Restricting Access to Only My Laptop
Scenario: You want only your laptop (with public IP 200.200.113.15) to be able to access your FortiADC instance. All other devices should be blocked.
Create the Laptop-Access-Only Security Group
- Navigate to Infrastructure > Network > Security Groups.
- Click + Add and assign:
- Name: Laptop-Access-Only
- Description: Allow secure remote access only from my laptop
- Scoped Cloud: Select the specific Availability Zone (for example, MTNNG_CLOUD_AZ_1).
- Select the Laptop-Access-Only group.
- Go to the Rules tab and add the rules described below.
Add the Laptop-Access Rules
Each rule uses Direction: Ingress, Rule Type: Custom Rule, Source Type: Network, Source: 200.200.113.15/32 and Destination Type: Instance.
- Rule 1 - SSH Access (Allow-SSH-From-Laptop): Protocol TCP, Port Range 22, Destination Port Range 22.
- Rule 2 - GUI Access (Allow-GUI-From-Laptop): Protocol TCP, Port Range 443, Destination Port Range 443.
- Rule 3 - SNMP Access (Allow-SNMP-From-Laptop): Protocol UDP, Port Range 161, Destination Port Range 161.
- Rule 4 - ICMP Access (Allow-ICMP-From-Laptop): Protocol ICMP.
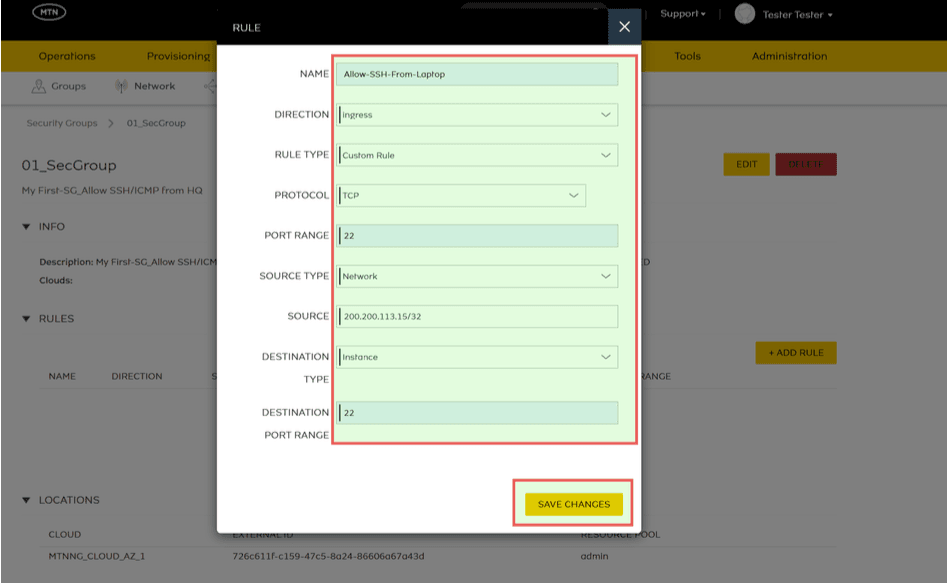
- Click Save Changes.
- Attach the Laptop-Access-Only group to your FortiADC instance in addition to the default Security Group.
Result: Only your laptop can successfully access the FortiADC instance on the open ports. All other attempts are denied.
Phase 3 - Provision the FortiADC Instance (BYOL)
Purpose: Deploy a FortiADC Application Delivery Controller instance with your configured Security Groups and network settings.
Navigate to Catalog
Navigate to Provisioning > Catalog.
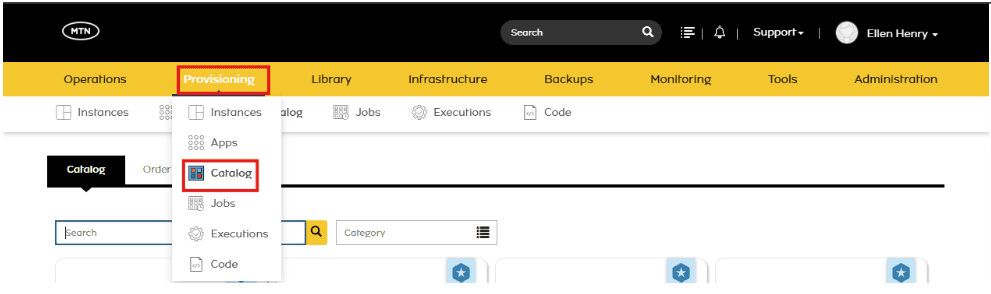
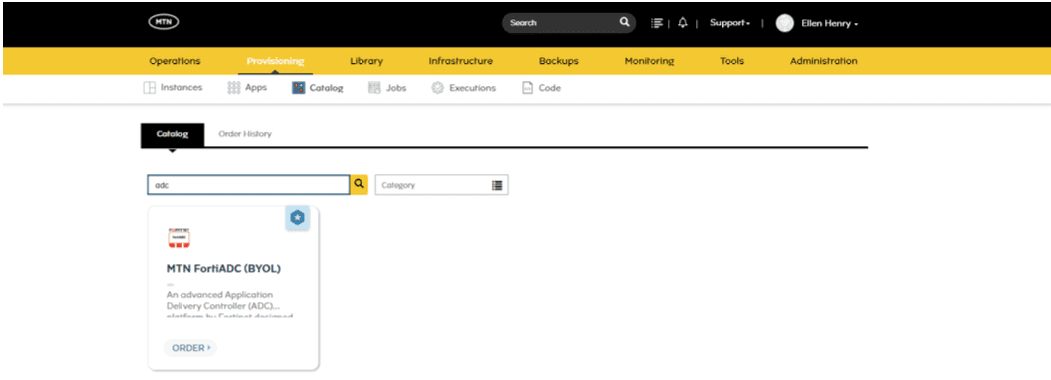
Search for and click MTN FortiADC (BYOL), then click Order to begin provisioning.
Configure Deployment
Fill in the following details in the order form:
General Configuration:
- Group & Cloud: Select your assigned group and cloud (for example, MTNNG_CLOUD_AZ_1).
- Name: Provide a unique name for your FortiADC instance.
- Environment: Select the appropriate environment (for example, Development, Staging, Production).
- Labels: Optionally, add labels for organizational purposes.
Instance Configuration:
- Resource Pool: Choose the appropriate Resource Pool (Project).
- Plan: Select a plan that meets the minimum CPU/memory requirements (minimum 2 vCPU & 4 GB RAM). Recommended: G8S32 (8 vCPU / 32 GB) or a smaller plan meeting the minimum.
- Volume: Select the required volume capacity (at least 32 GB base).
- Network(s): Assign your Network.
- Floating IP: Assign a floating IP if required.
- Security Groups: Select both the Default Security Group and the custom Security Group created earlier.
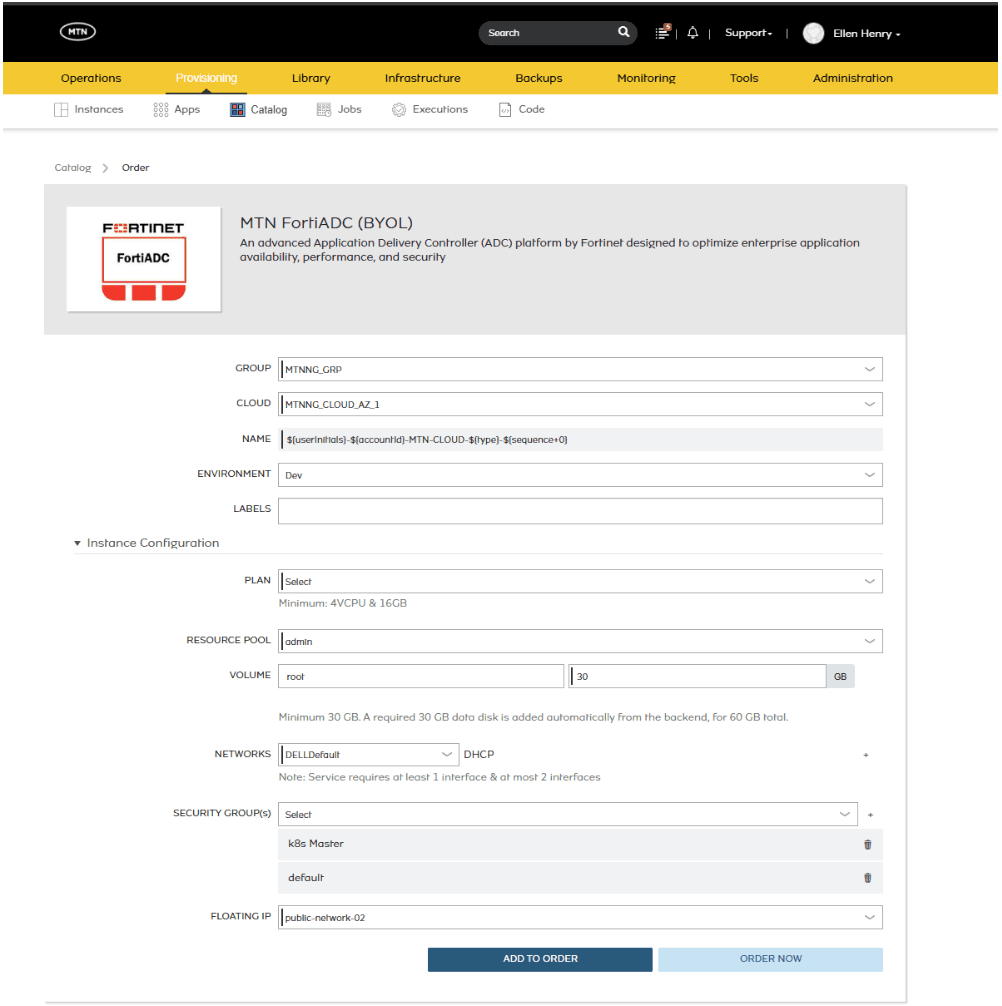
Click Order Now to initiate the deployment. MTN Cloud will provision and display the instance status once deployment is complete.
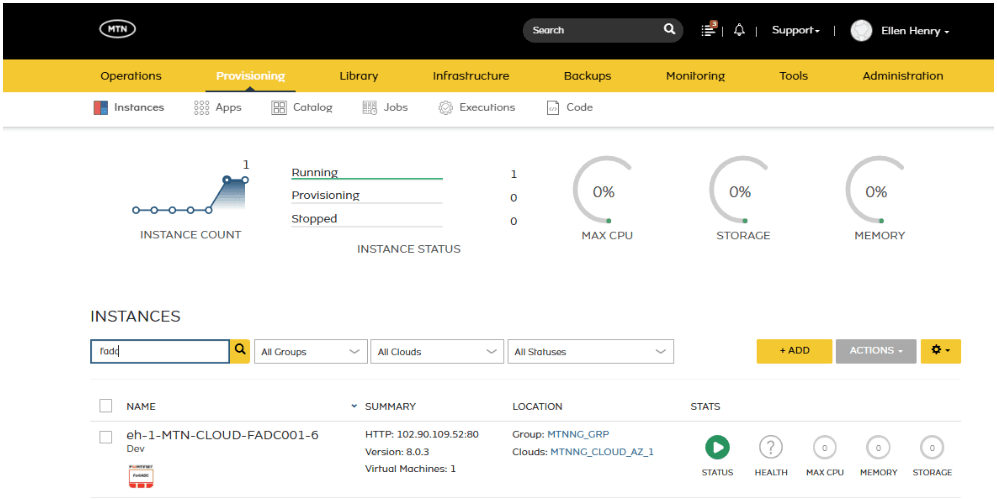
Access the FortiADC Management GUI
Once provisioning is complete, you can access the FortiADC Management GUI:
- Navigate to the Addresses section of the instance details.
- Use the public IP or floating IP assigned to the instance.
- Access the GUI via HTTPS: https://<floating-ip>
Default Credentials:
Username: admin
Password: pAssword@123
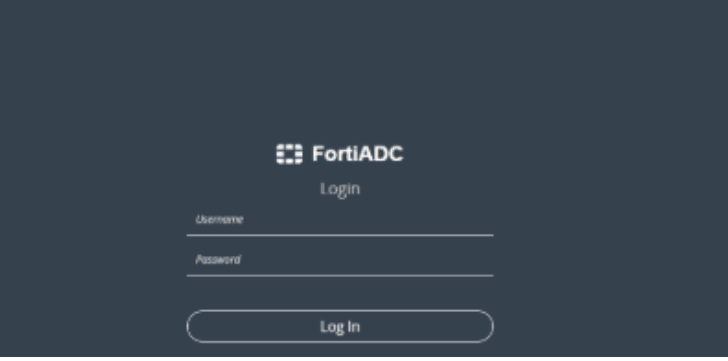
Important: It is highly recommended to change the default password immediately upon first login and store the new credentials securely.
Important Tips and Notes
- License Activation: This is a Bring Your Own License (BYOL) instance. On first login, the FortiADC will prompt for a license. Use a valid FortiADC license key or a FortiCloud free-trial license to unlock full functionality.
- Naming Conventions: Use consistent names for keys, networks, and instances to simplify management.
- Documentation: Keep a record of IP addresses, credentials, and assigned resources for future reference.
- Security Groups: Regularly review and update rules to follow the principle of least privilege.
- Reusability: You may reuse Security Groups and username/password configurations for subsequent FortiADC deployments based on your security considerations.
- High Availability: For production environments, consider deploying FortiADC in an active-passive cluster to ensure application continuity. Contact MTN Cloud Support for assistance with cluster configuration.
- System Requirements: Ensure that the selected Plan meets or exceeds the minimum system requirements. Under-provisioning may result in performance issues or deployment failures.
- Monitoring: Leverage the FortiADC monitoring capabilities to track application performance, traffic patterns, and system health. Set up alerts for critical metrics.