
Virtual Machine (VM) Provisioning Guide on MTN Cloud
Overview
This guide covers the end-to-end provisioning of a virtual machine (VM) on the MTN Cloud Platform. It provides step-by-step instructions for user creation, SSH key management, and VM deployment to ensure a secure and efficient setup for your workloads.
Why it matters:
- Secure Access Control: Properly configured users and SSH keys ensure that only authorized personnel can access your virtual machines.
- Network Isolation: VMs are deployed on tenant-specific networks with configurable routing, providing secure separation from other customers.
- Flexible Deployment Options:Customize VM specifications—including CPU, memory, storage, and operating system—to match your specific workload requirements.
- Scalability: Provision multiple VMs quickly using consistent configurations, enabling rapid scaling of your infrastructure.
Prerequisites
Before you begin, ensure you have:
- An active MTN Cloud Console login with the appropriate permissions (e.g., Customer Admin User role) to view both the “infrastructure” and “Provisioning” tab.
- A created Resource Pool (Project). Refer to the Project Creation Workflow documentation for detailed steps.
- A created Network. Refer to the Network and Router Creation Workflow documentation for detailed steps.
- A created Router with the network from prerequisite (3) attached. Refer to the Network and Router Creation Workflow documentation for detailed steps.
- A created Security Group with the appropriate inbound/outbound rules. Refer to the Security Group Creation documentation for detailed steps.
- A planned deployment strategy, including:
- Resource specifications (CPU, RAM, storage)
- Target network for the VM
- IP addressing requirements
- Required inter-communication and associated security group rules
- Whether a floating IP is needed
Important Note: For web servers, you must include an inbound rule in your security group for Port 80 (or your custom web server port) to ensure the web server is accessible.
Phase 1 – Create Linux/Windows User
Purpose: Configure user credentials that will be used to log in to provisioned VMs via the console and manage resource ownership within the MTN Cloud Platform
Step 1 – Select Catalog Item
Navigate to User Settings by clicking the dropdown beside your name at the top right corner of the screen.

Figure 1: Access User Settings from the top right dropdown menu
Step 2 – Configure User Credentials
Locate the Linux Settings section and assign the following:
- Username: Enter a username for Linux VM access.
- Password: Enter a strong password.
- Confirm Password: Re-enter the password to confirm.
- SSH Key: Optionally, select an existing SSH key pair if you have one configured.
Repeat the same process for your Windows Settings if you plan to deploy Windows-based VMs.
Once all details are entered, scroll to the bottom of the page and click Save.
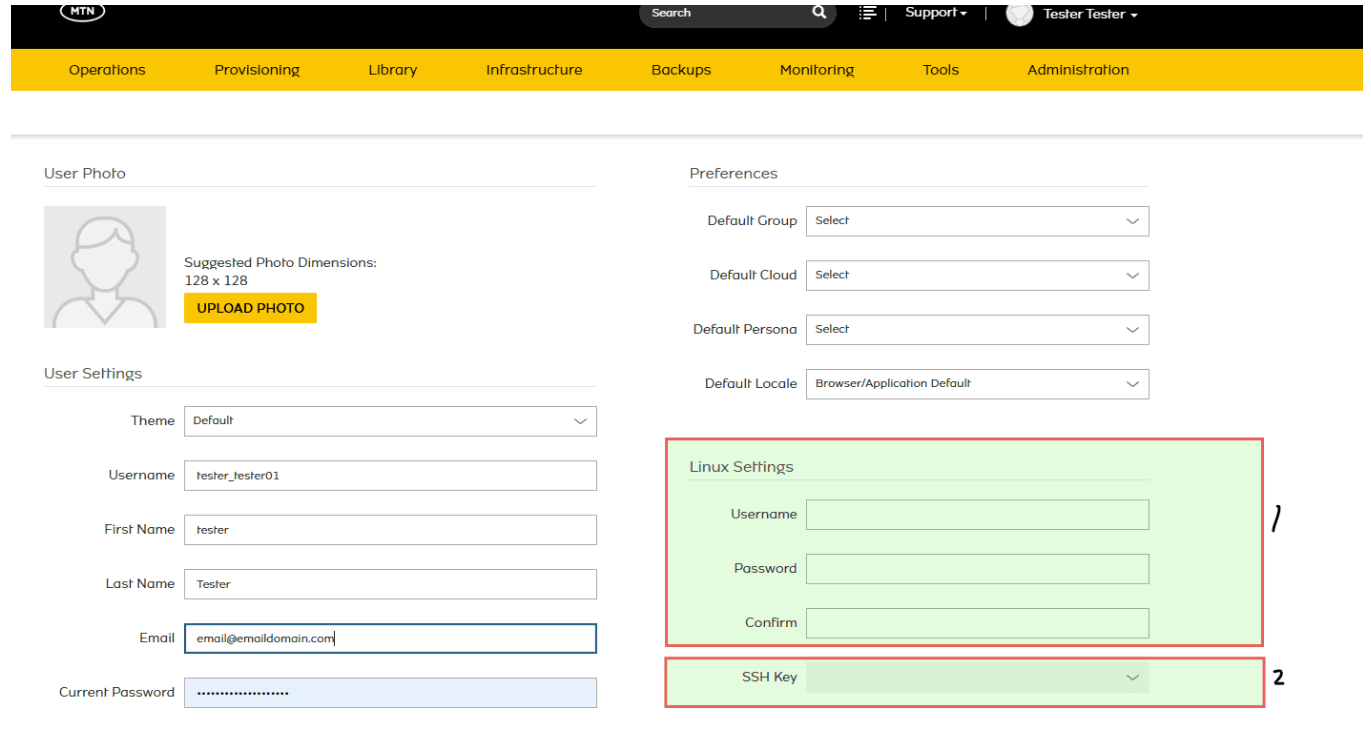
Figure 2: Fill in the desired username and password
Phase 2 – Create or Import SSH Keys
Purpose: Enable secure, passwordless access to provisioned Linux VMs.
Step 1 – Generate New SSH Key Pair
- Navigate to Infrastructure > Trust > Key Pairs.
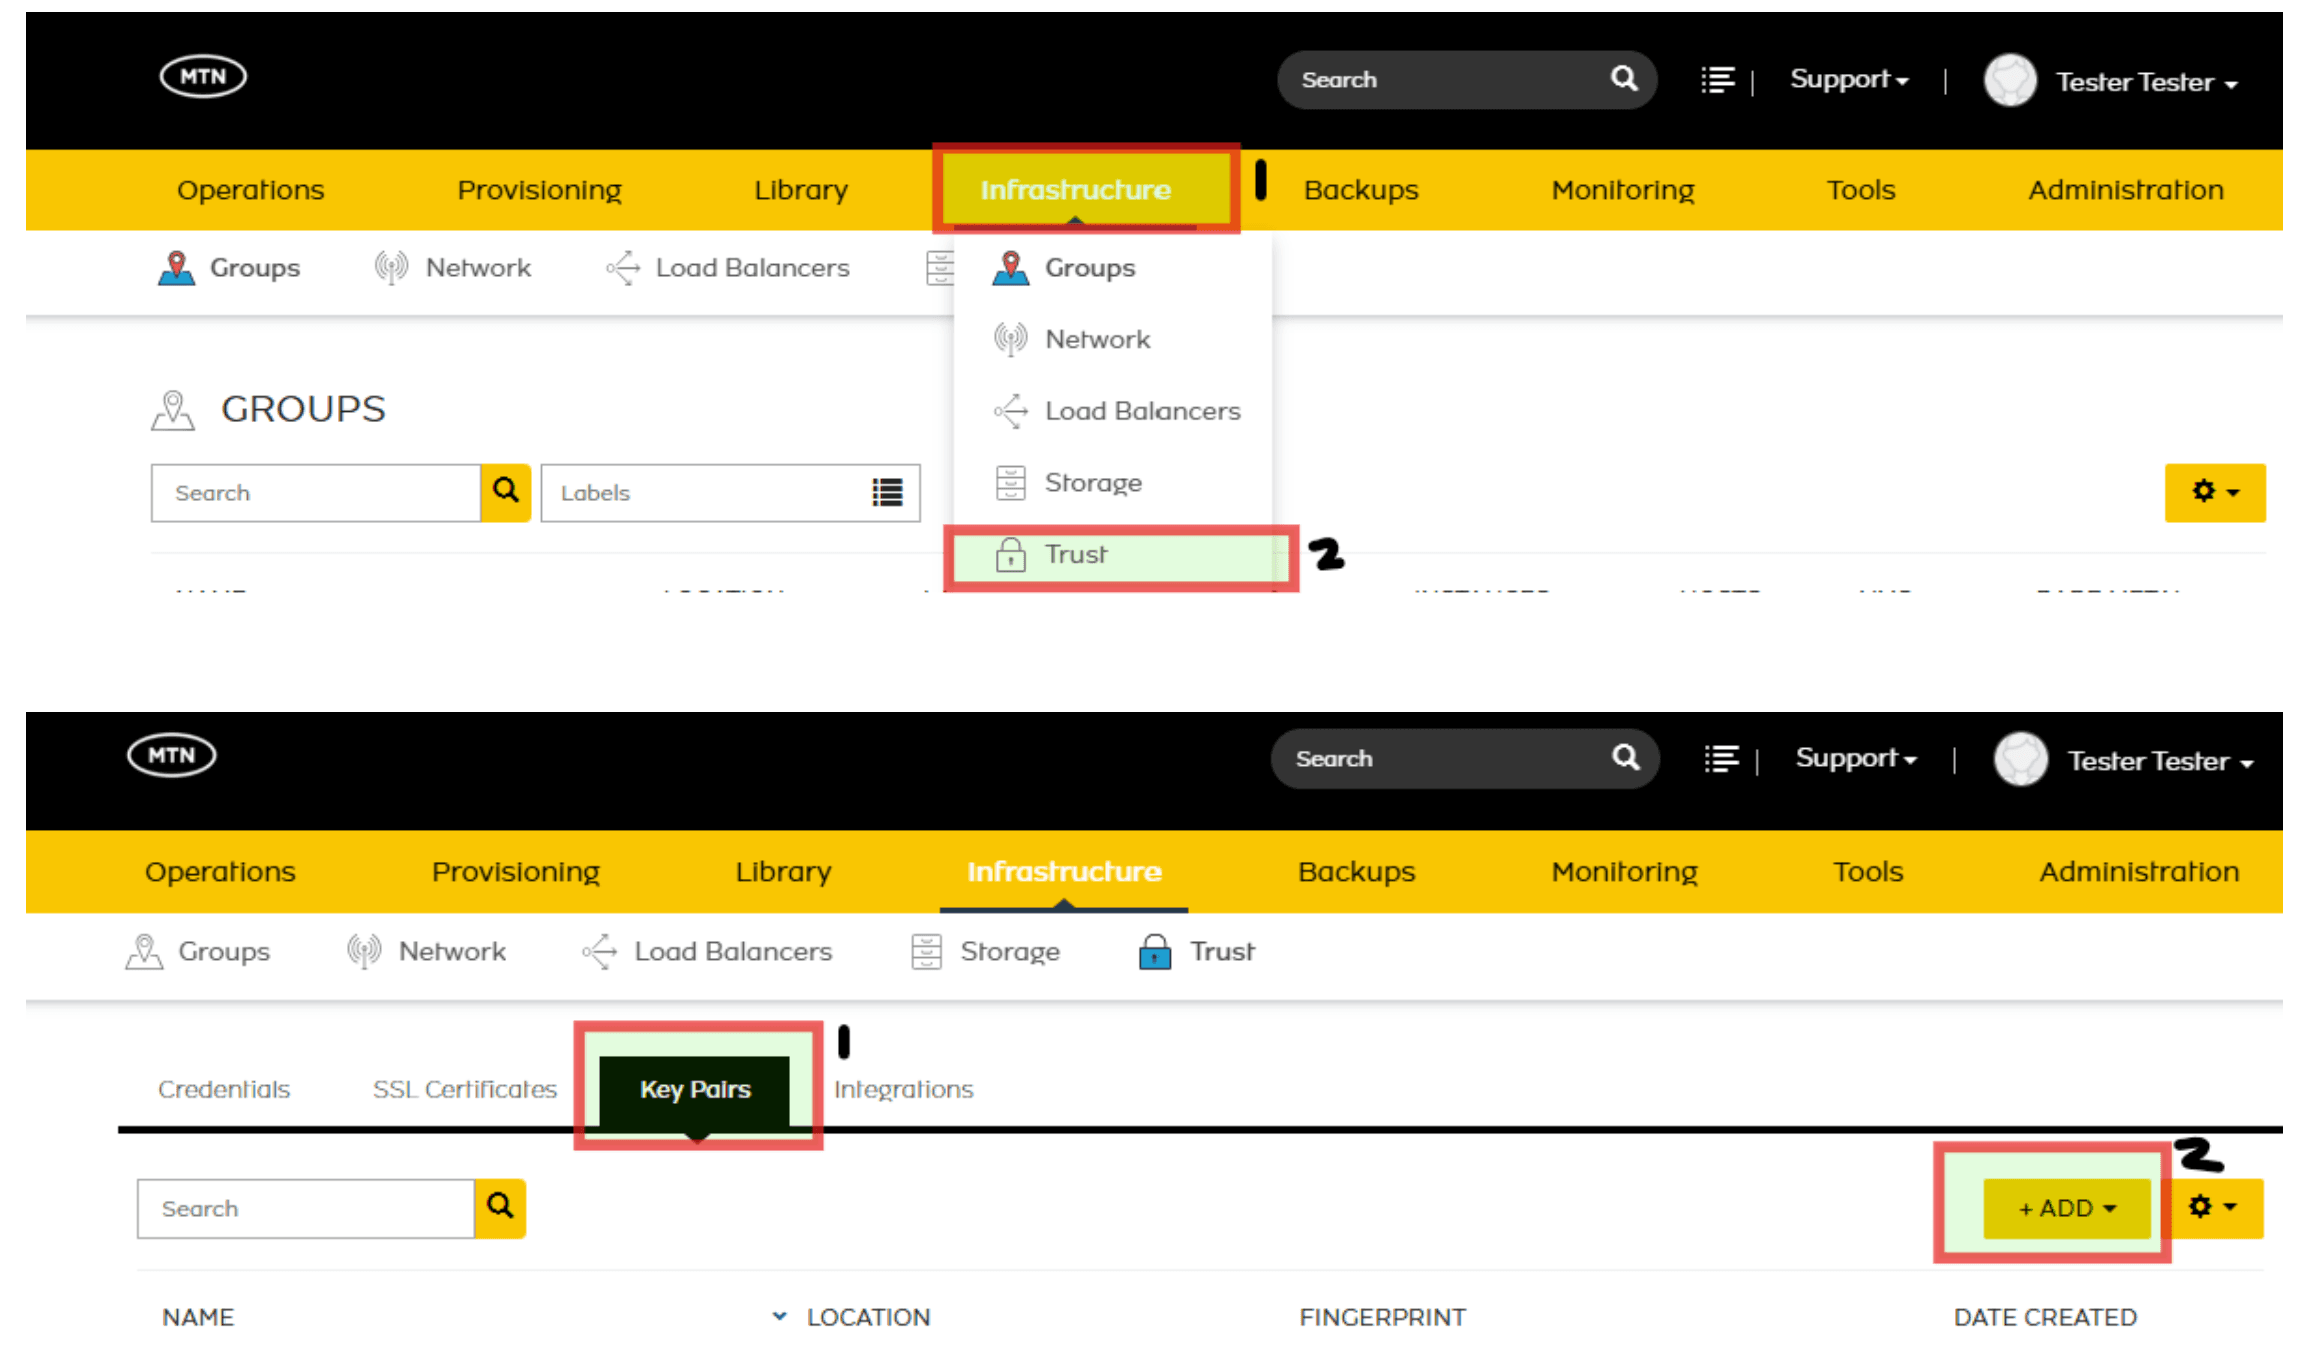
Figure 3: Access Key Pairs from the Infrastructure menu.
- Click +Add.
- Select Generate Key Pair.
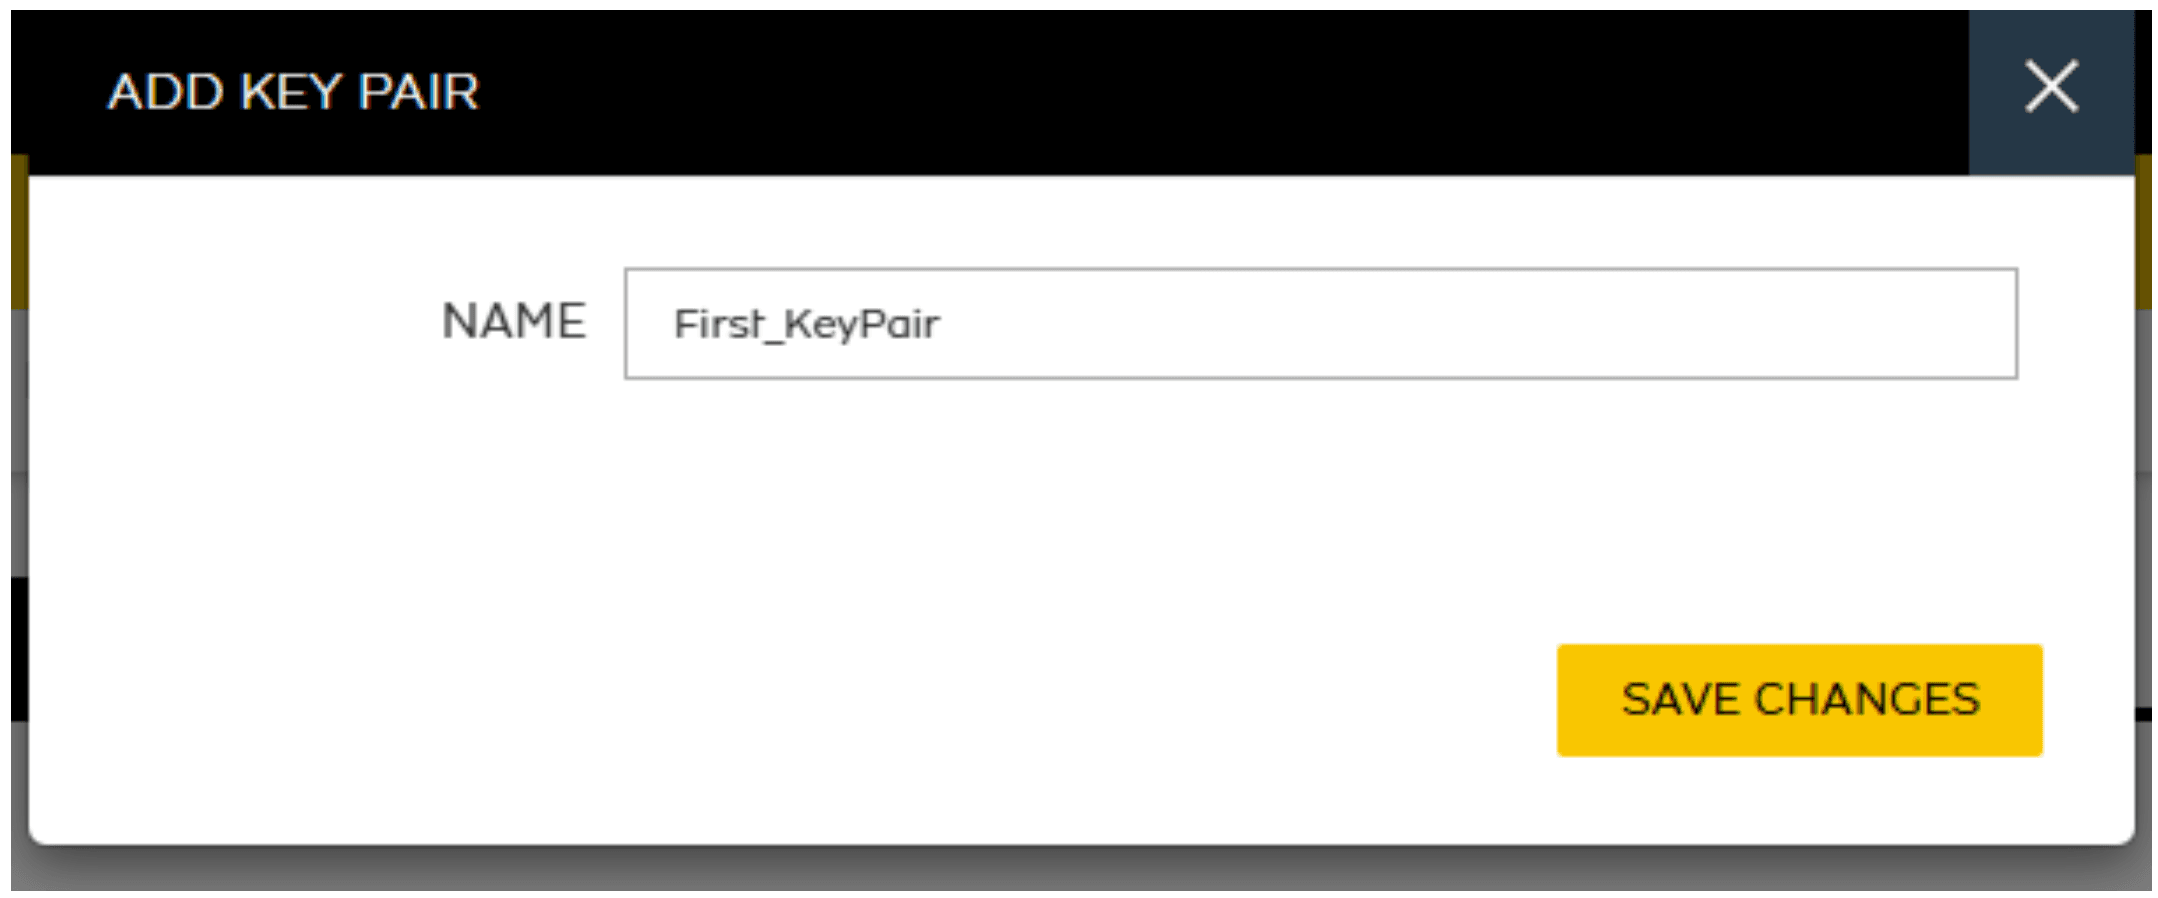
Figure 4: Select Generate Key Pair and assign a name
- Assign a Name to the key pair.
- Click Save Changes.
Note: Immediately after creation, both the Public and Private keys are displayed on the screen. Handle this information with care and store it securely.
- On the newly generated key pair, select the info icon and copy the key pair if needed for external storage or use.
- Navigate to User Settings.
- Locate Linux Settings.
- On the SSH tab, select your generated SSH key pair from the list.
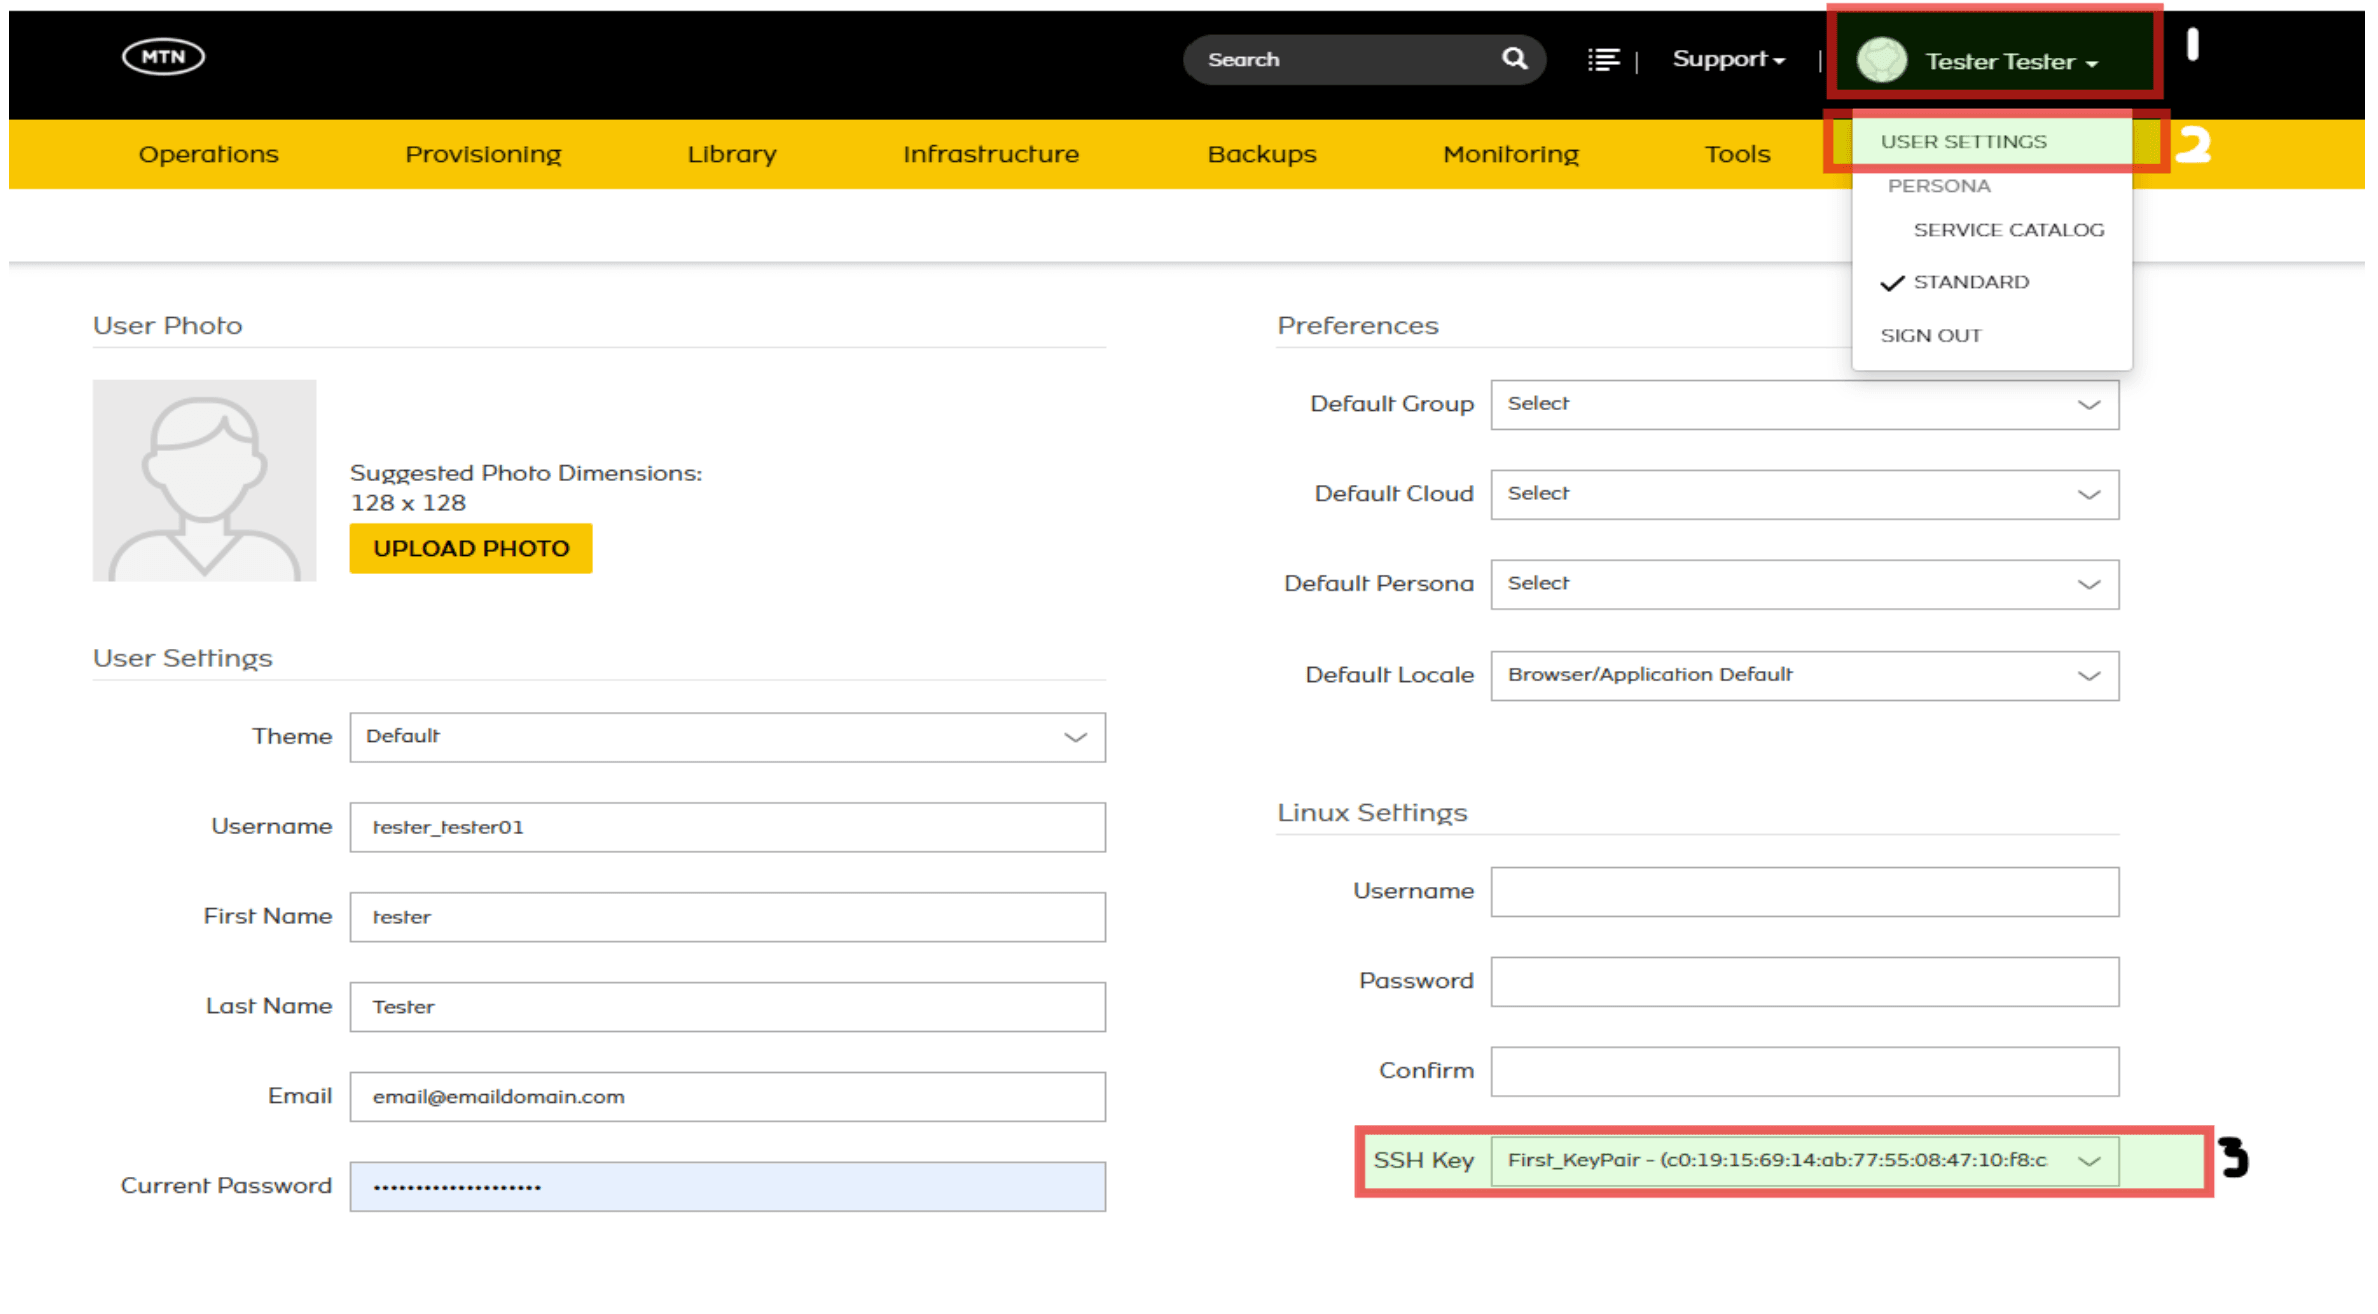
Figure 5: Selected created keypair
- Scroll down and click Save Changes.
Step 2 – Import Existing SSH Key Pair
- Generate an SSH key pair on your local machine using the command: ssh-keygen -m pem -t rsa
- Navigate to Infrastructure > Trust > Key Pairs.
- Click +Add.
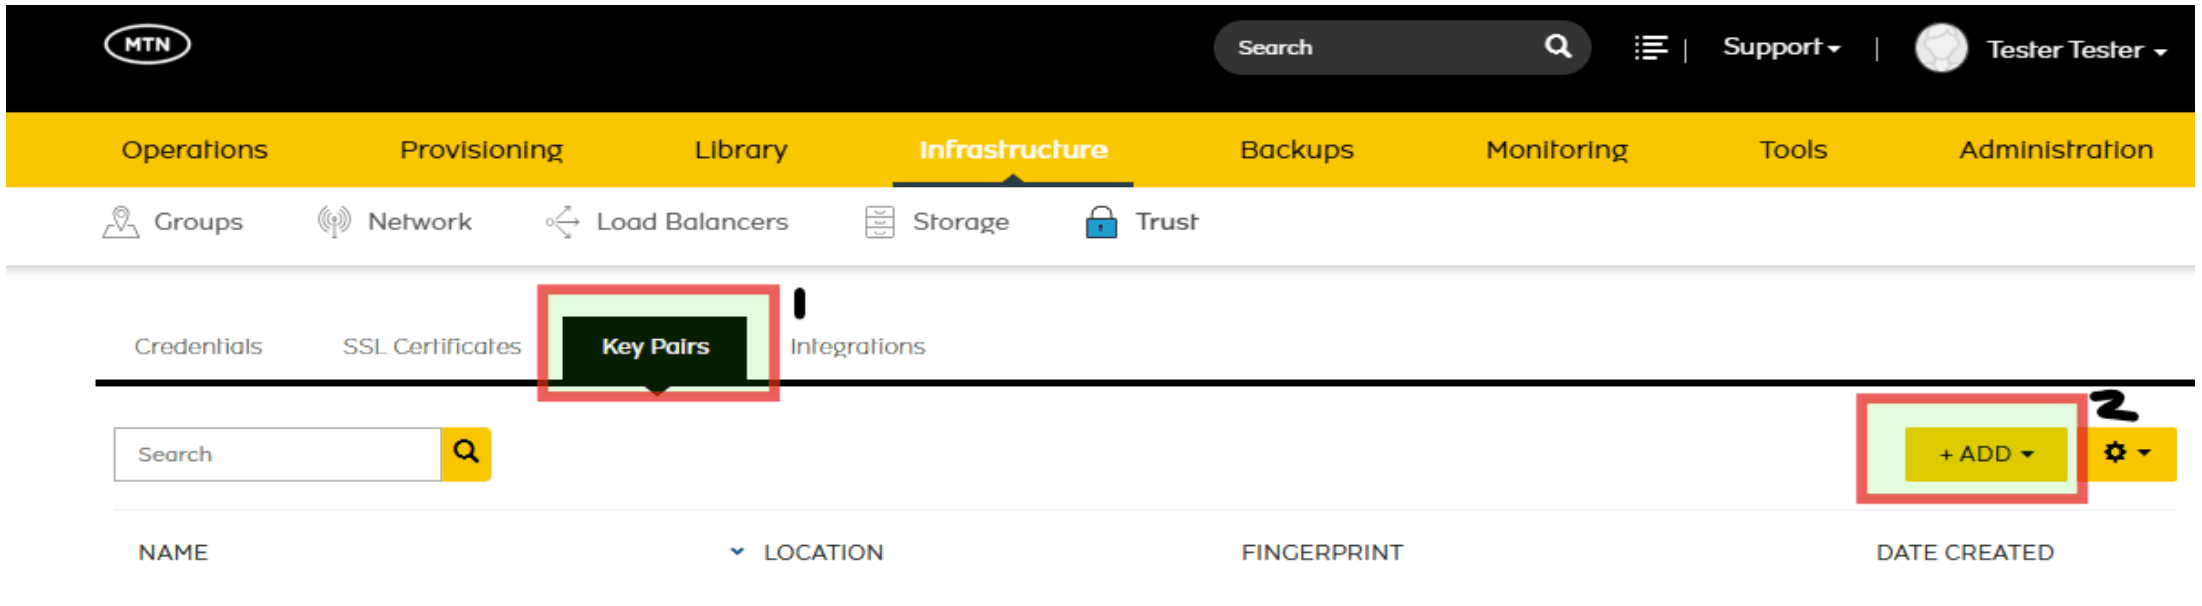
Figure 6: Access Key Pairs from the Infrastructure menu and click Add
- Select Existing Key Pair.
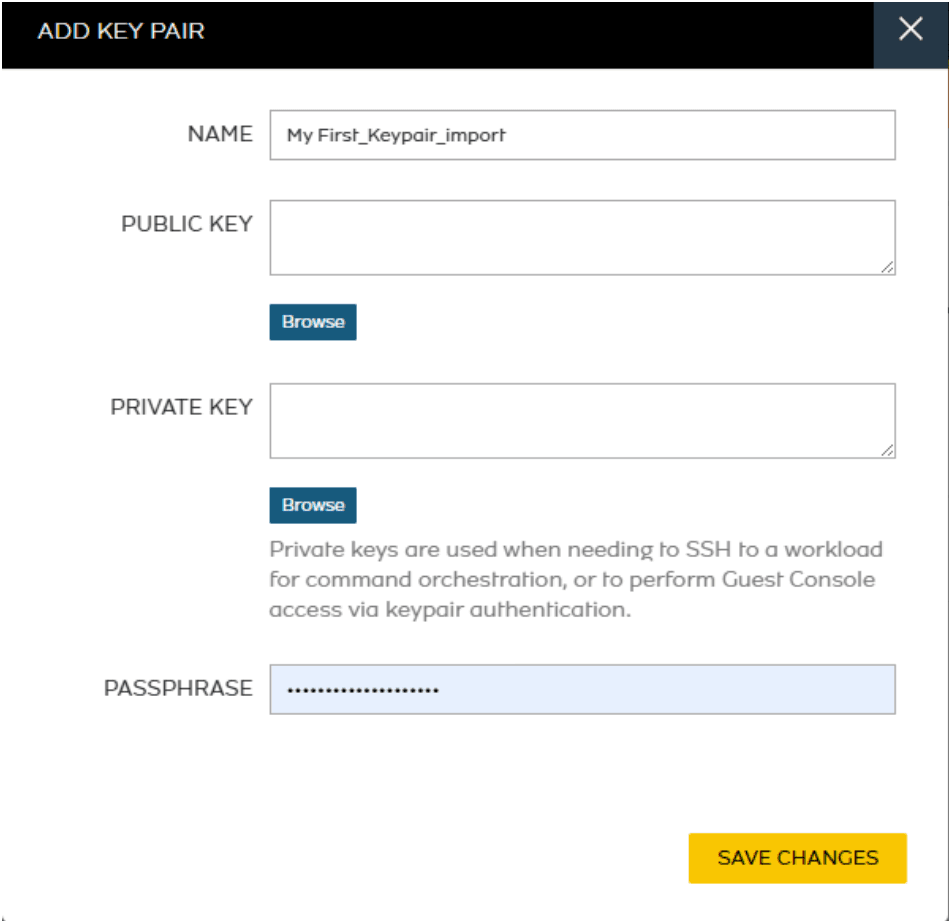
Figure 7: Select Existing Key Pair to import
- Assign a Name for the imported key pair.
- Browse for or paste your Private Key.
- Browse for or paste your Public Key (with .pub file extension).
- Click Save Changes.
- Navigate to User Settings.
- Locate Linux Settings.
- On the SSH tab, select your imported SSH key pair from the list.
- Scroll down and click Save Changes.
Phase 3 – Provision the Virtual Machine
Purpose: Deploy a virtual machine with your configured user credentials, SSH keys, and network settings.
Step 1 – Navigate to Instances
Navigate to Provisioning > Instances.
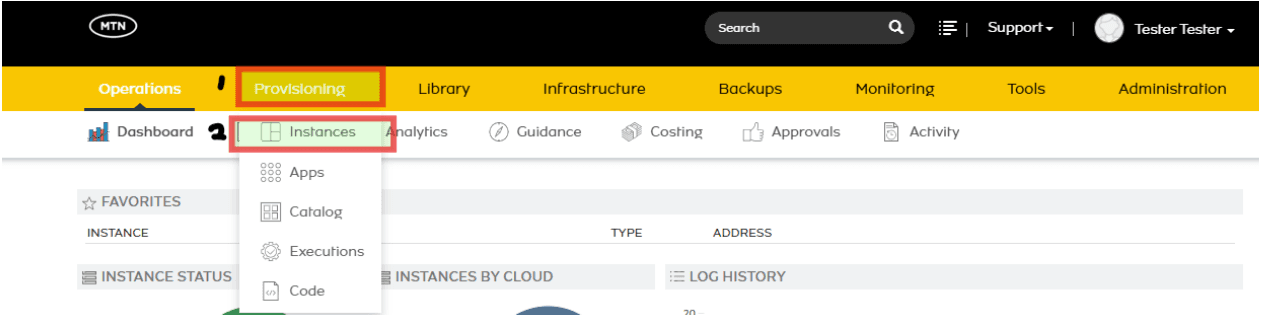
Figure 8: Access Instances from the Provisioning menu
Click +Add to begin provisioning.
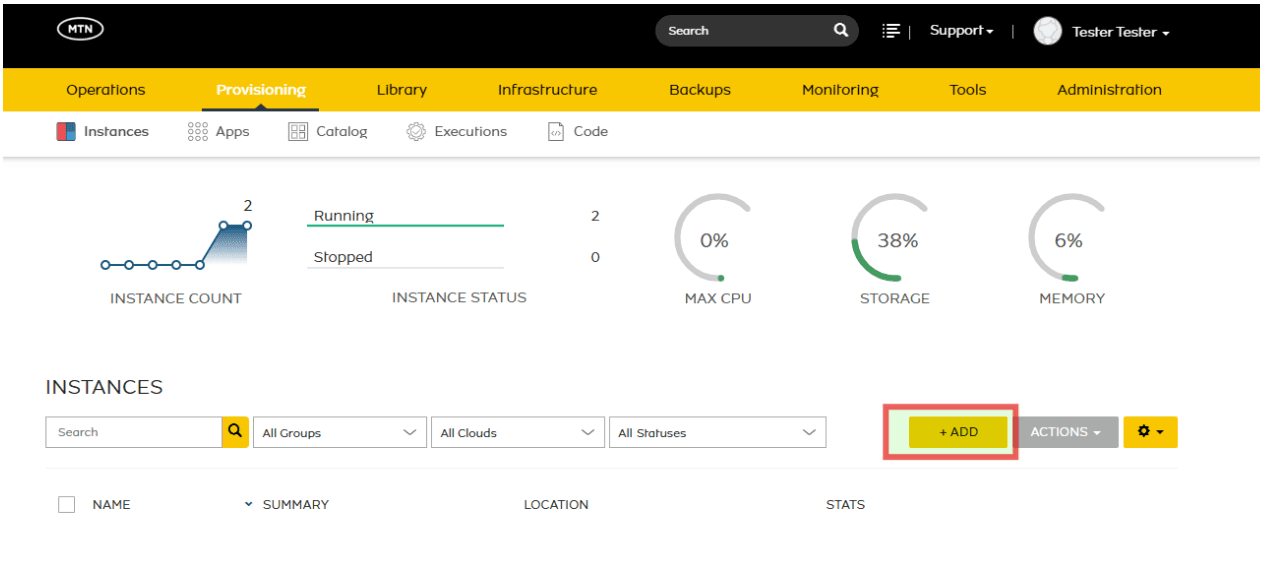
Figure 9: Click Add
Step 2 – Select Instance Type and Configure Basic Settings
- Select the Instance Type, which determines the operating system to be installed (e.g., MTN WINDOWS SERVER 2019, MTN CENTOS STREAM 10).
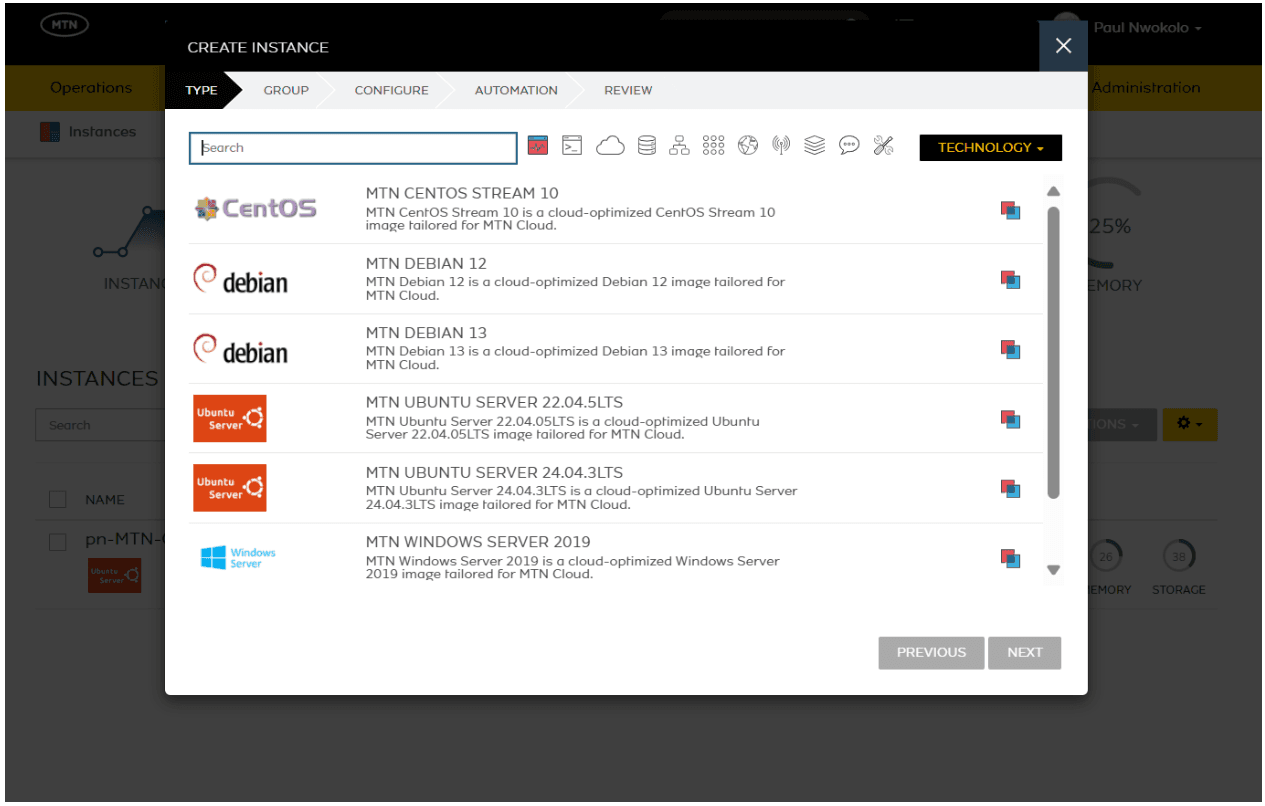
Figure 10: Select the desired operating system
- Select the Group and Cloud where the VM will be deployed (e.g., MTNNG_Cloud_AZ_1).
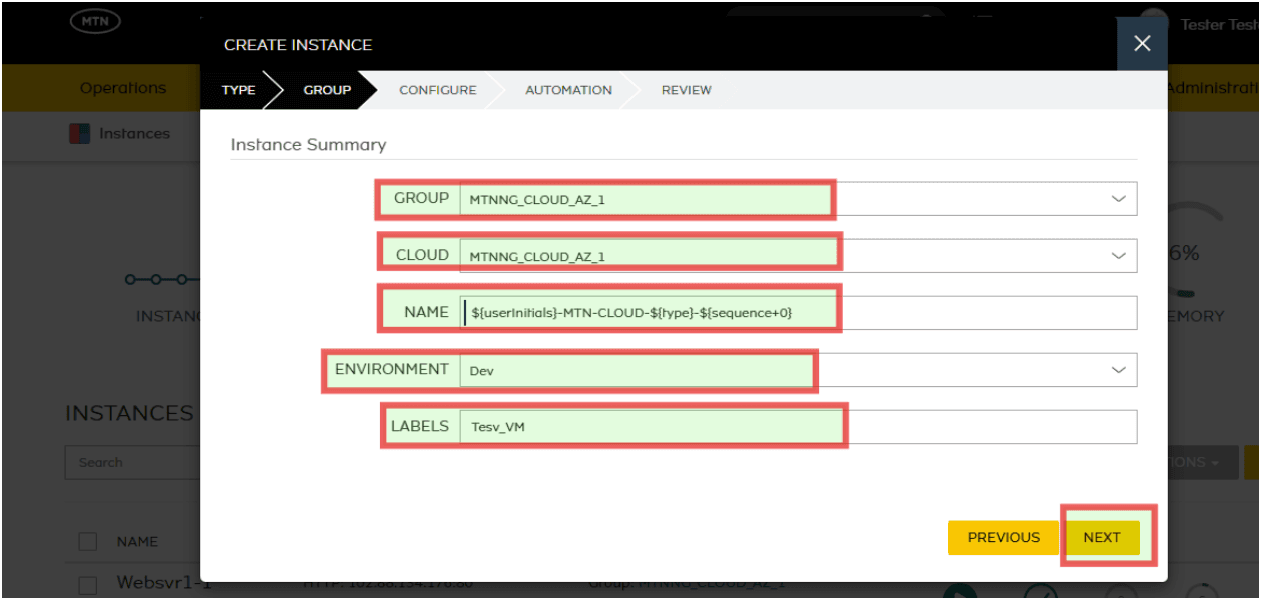
Figure 11: Select Group and Cloud
- Input a VM Name or leave the automatically generated name provided by MTN Cloud based on naming conventions.
- Choose the appropriate Environment for the VM (e.g., Development, Staging, Production).
- Optionally, add a Label for organizational purposes.
- Click Next.
Step 3 – Configure Compute, Network, and Security Settings
The selected Instance Type automatically determines the Layout and reflects the operating system configuration.
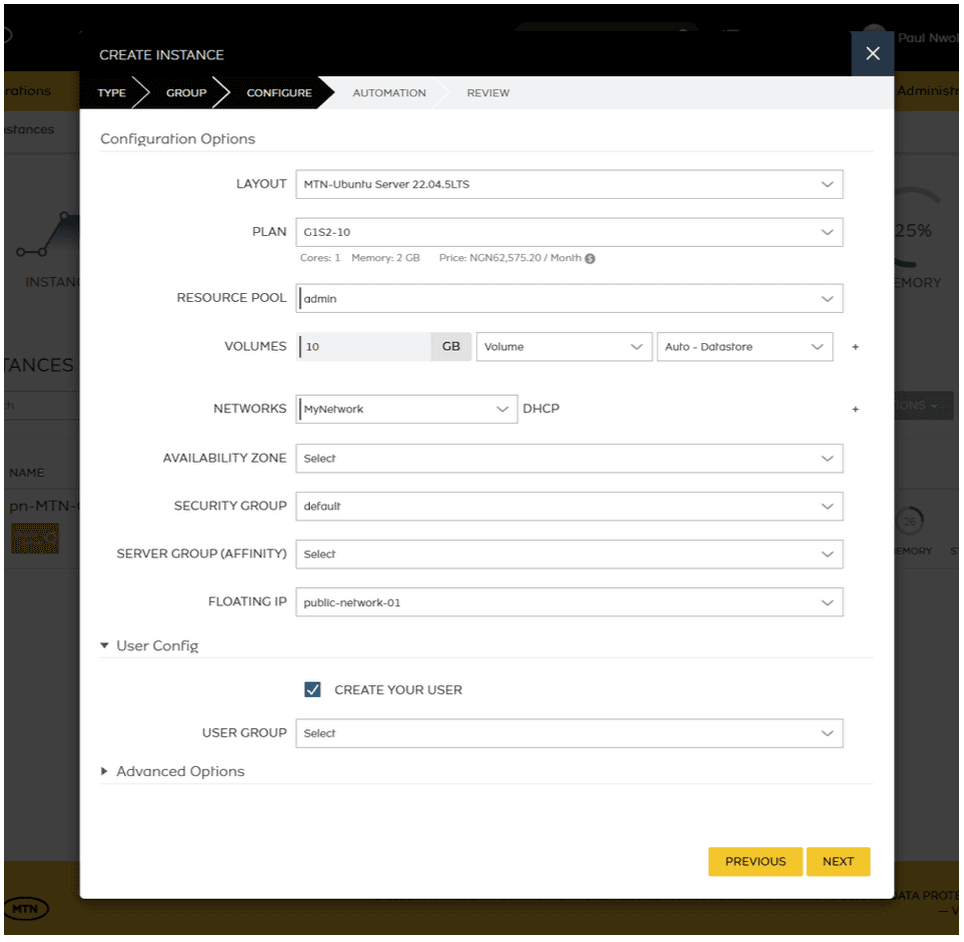
Figure 12: Configure compute and network settings
- Select a Planthat defines the VM’s CPU and memory resources.
- Select the required Volume capacity.
Note: Windows Server instances require a minimum of 40 GB of storage. - Select the Resource Pool (Project) that was initially created.
- From the list, select the Network you have created.
- Assign Floating IPs based on the selection made during router creation for the selected network.
- In the Availability Zonesection, select one of the available Fault Domains to define the VM’s physical placement and redundancy.
- Assign the Default Security Group to manage necessary firewall rules and traffic access.
Note: Your custom security groups can be attached after provisioning (see Step 6 below). For detailed instructions on creating and managing security groups, refer to the Security Group Creation documentation.)
Step 4 – Configure Advanced Options
- Open the User Config tab and check the Create Your User box.
- Under Advanced Options, modify any required ports and protocols for the VM (e.g., SSH, HTTP, custom application ports).
Note: Load balancing requires at least one port to be available, which will then be configured on the available port protocol.
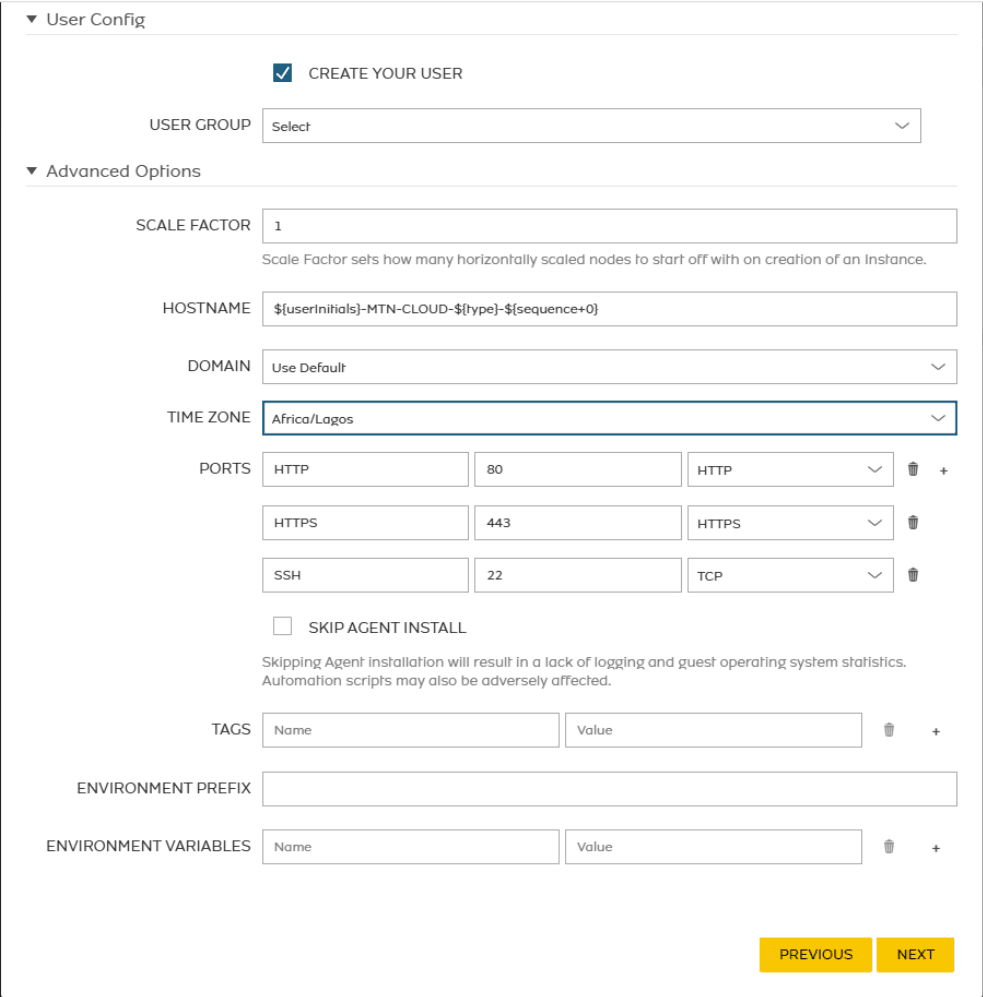
Figure 13: Configure advanced options such as ports and agent installation.
- Allowing Agent install enables alerts and logging for VM health and performance, and other ancillary tasks. This agent installation requires that:
- The network is attached to a router (refer to the Network and Router Creation Workflow documentation), OR
- The VM proxies through another instance.
- Specify the Hostname or leave it to be autogenerated. Preference is to add your own identifier (e.g., AppSvr-) in front of the autogenerated placeholder.
Example: AppSvr-${userInitials}-${accountId}-MTN-CLOUD-${type}-${sequence+0}
- Optionally, attach any Automation Workflows/Tasks for pre- or post-provisioning tasks such as software installation, configuration, or monitoring setup.
- Optionally, enable Deployments to keep track of versions.
- Optionally, create a Load Balancer Virtual Service to load balance services from the server. The ports available for this service will match the services already opened earlier in this page.
- Optionally, configure Scale settings by providing Scale Type and Threshold settings for scaling.
- Optionally, configure Backups and Lifecycle policies.
Step 5 – Review and Launch
- Carefully review all configuration details to ensure accuracy and alignment with your deployment requirements.
- Click Complete to launch the VM. MTN Cloud will begin provisioning and display the instance status once deployment is underway.
- Navigate to Provisioning > Instances, click on the VM being deployed (notice the green Rocket icon), and watch the deployment progress.
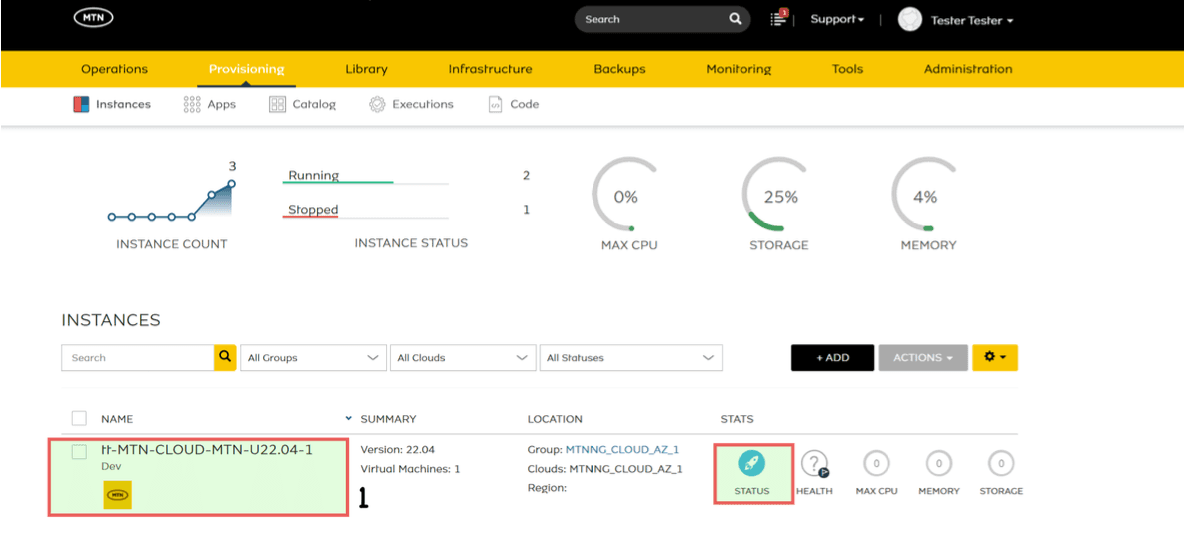
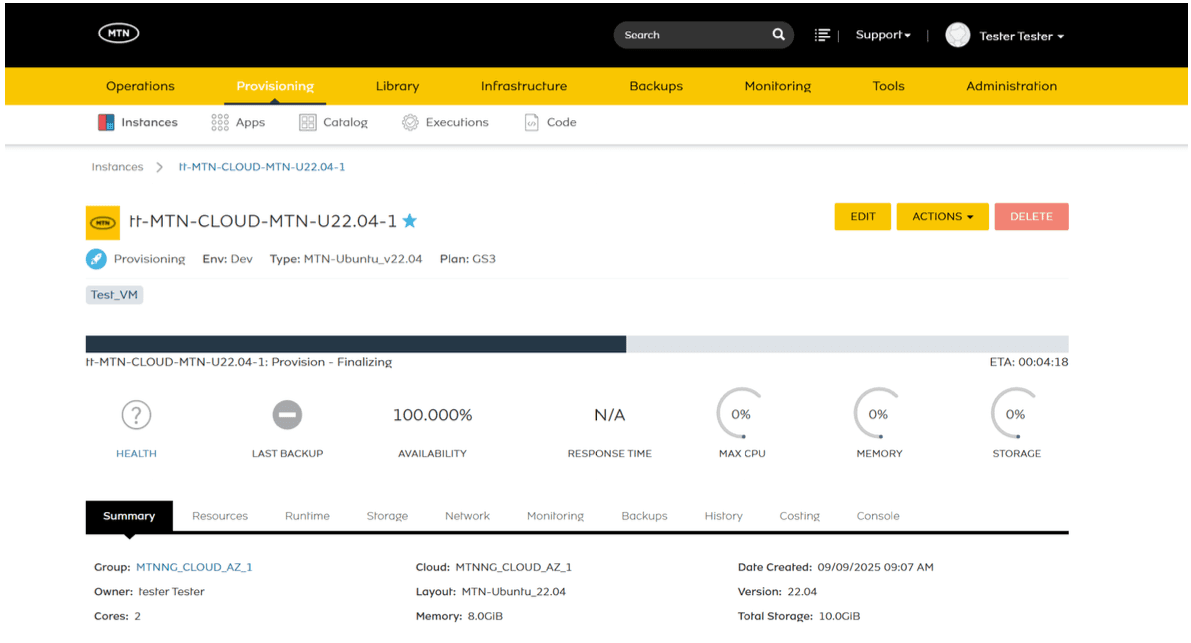
Figure 14: Monitor VM deployment progress
Step 6 – Attach Additional Security Groups
Once deployment completes:
- Click on Network and toggle the button from Interfaces to Security Groups.

Figure 15: Access security groups from the Network tab.
- Click Edit Security Groups to add your custom security group to the Default group that is currently applied.

Figure 16: Edit security groups
- Type the security group name into the Search Security Group box and click to select from the list that appears.
- Click Save.
- Click on the Summary tab to view your deployed VM details. Take note of the private and public IP addresses.
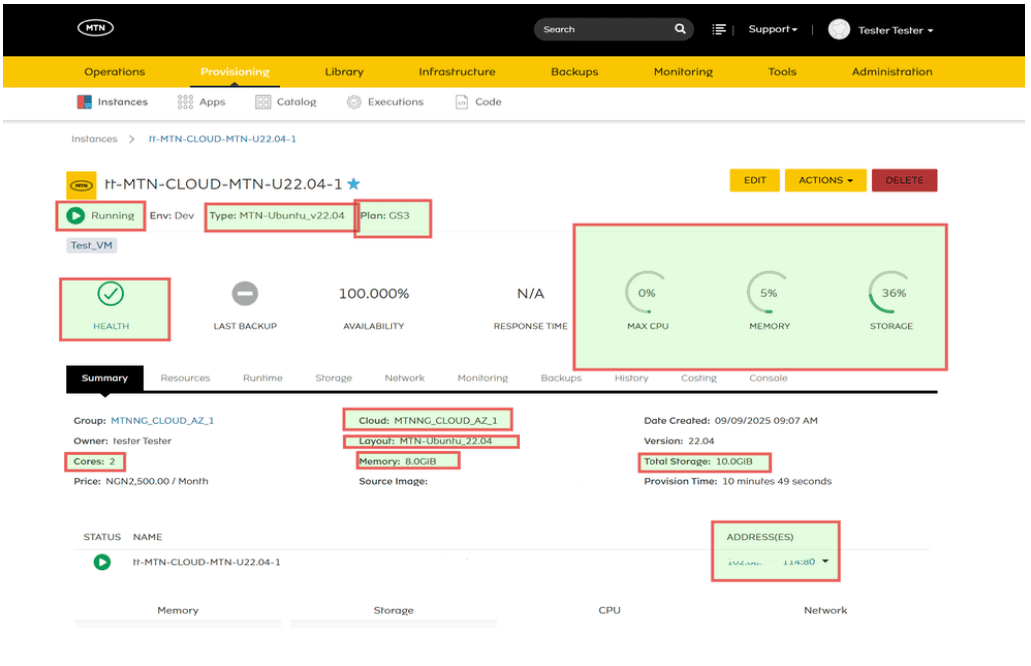
Figure 17: View deployed VM summary
Accessing the VM should be via the VM Console (within the cloud console) or SSH (based on the use case above).
Final Notes
- Naming Conventions: Use consistent names for keys, networks, and instances to simplify management.
- Documentation: Keep a record of IP addresses, credentials, and assigned resources for future reference.
- SSH Keys: Used exclusively for Linux VMs, providing secure, passwordless authentication. Windows VMs use the configured username and password.
- Monitoring: Allowing the agent to install ensures enabling alerts and logging for VM health and performance.
- Security Groups: Regularly review and update rules to follow the principle of least privilege. For detailed guidance, refer to the Security Group Creation documentation.
- Reusability: You may reuse SSH keys, security groups, and usernames/passwords for subsequent VM deployments based on your security considerations.