
Users and Role Management on MTN Cloud
Before You Start (prerequisites)
- Have an MTN Cloud Console login with the required role (permissions) to view Provisioning, e.g., the Customer Admin User role assigned.
- Have a provisioned virtual machine instance ready for configuration.
Tip: If you cannot see the Users and Roles features despite having the correct role, try refreshing the portal. If the issue persists, contact MTN Cloud Support.
Roles
A defined set of rights and privileges — essentially a “personality” — that determines what operations a user can perform. Roles are the building blocks of permissions and the primary mechanism for managing access to features and services on the MTN Cloud. Each newly created tenancy includes six (6) predefined roles by default. They include:
- Customer Admin User - Tenant Admin User Role for Customer. The Tenant Admin may branch off from this role to scale down permissions for other users.
- Customer Audit Admin User - Read-Only Access (view-only permissions for all resources).
- Customer Billing User - Can create and configure budgets, and generate invoices, cost reports, and related billing artifacts.
- Customer Cloud User - Can deploy, modify, and delete their own resources across MTN Cloud, but cannot create or modify IAM roles, users, or groups.
- Customer Power User - Can deploy, modify, and delete all resources across MTN Cloud, but cannot create or modify IAM roles, users, or groups.
- Customer Network Admin - Users can create, modify, and delete networks, routers, and subnets; manage security groups, firewall rules, load balancers, and VPNs, but have no access to compute, billing, or any other MTN Cloud resource.
IMPORTANT NOTE: It is strongly recommended not to delete the predefined MTN Cloud roles listed above. Once deleted, these roles cannot be recovered.
The Right Sequence
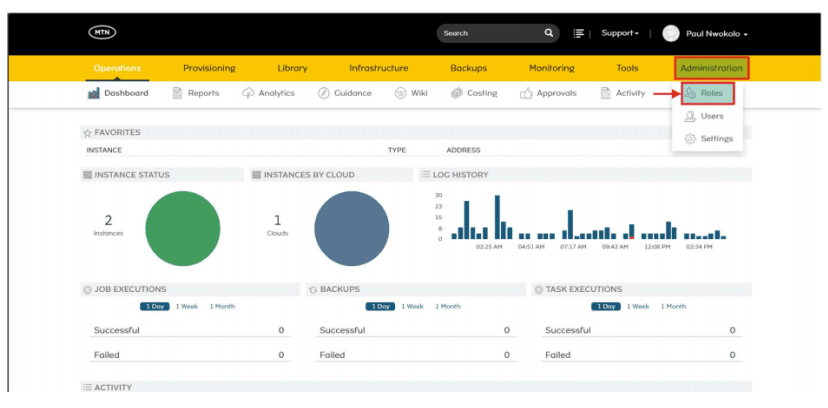
- Accessing Roles:— Go to Administration → Roles to begin managing role configurations.
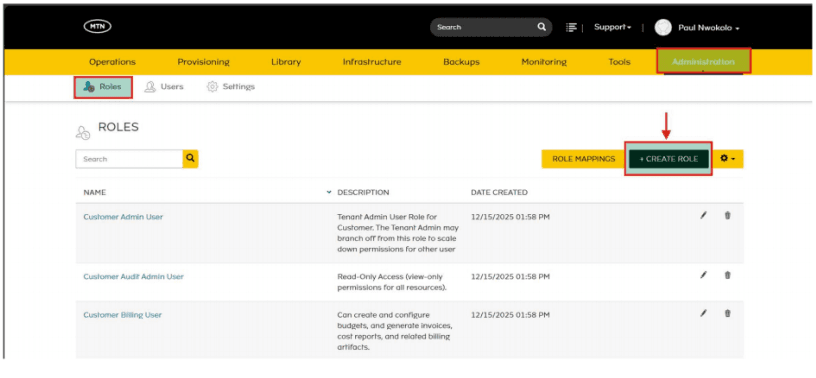
- Create a New Role: Select + CREATE ROLE.
- Leverage Existing Configurations: Utilise the Copy From Role option to duplicate a proven setup for increased efficiency.
- [Optional] Configure Role Details: Adjust specific tabs, excluding features and permissions.
Step 1: Navigate to Roles
As a Customer Admin User — or any user with equivalent administrative privileges — navigate to the Administration tab.
- Select Roles
Step 2: Create Roles
- Initiate Creation: Click on + CREATE ROLE
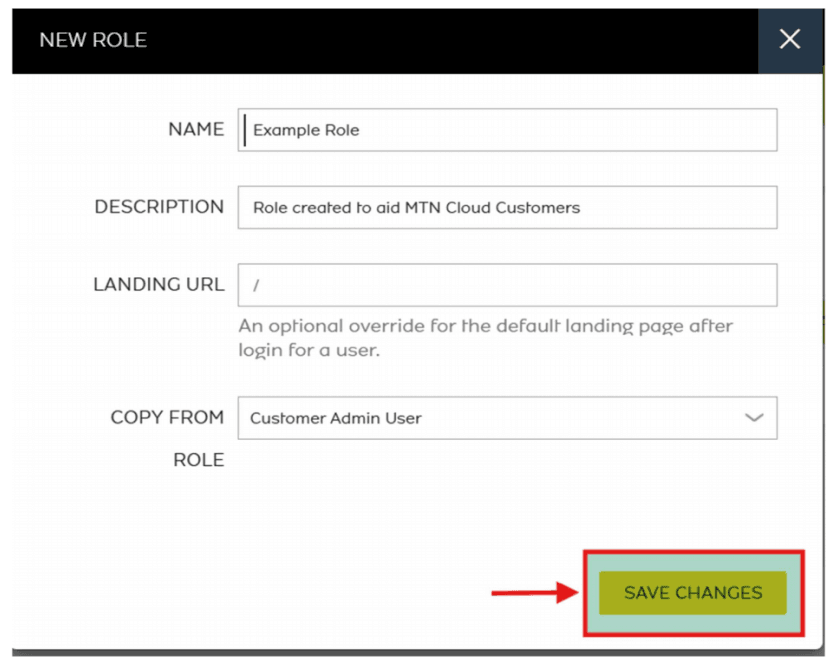
When creating a role, you must set key fields that establish its identity and permissions:
- NAME: Provide a unique and identifiable name for the role.
- DESCRIPTION: Optional summary of the role's purpose or access level.
- LANDING URL: Default is the Dashboard. You can specify a custom page.
- COPY FROM ROLE: - Optional. Duplicate an existing role as a template. If none is selected, all permissions default to NONE.
Select the Save Changes button to create the role.
Step 3: Configure Role Details
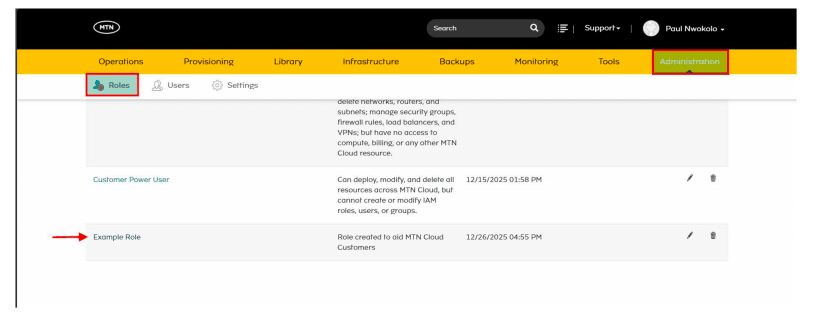
- After creating the role, select it from the list by clicking the entry highlighted in blue.
- Clicking the EDIT button allows you to modify the role's name, description, and landing URL.
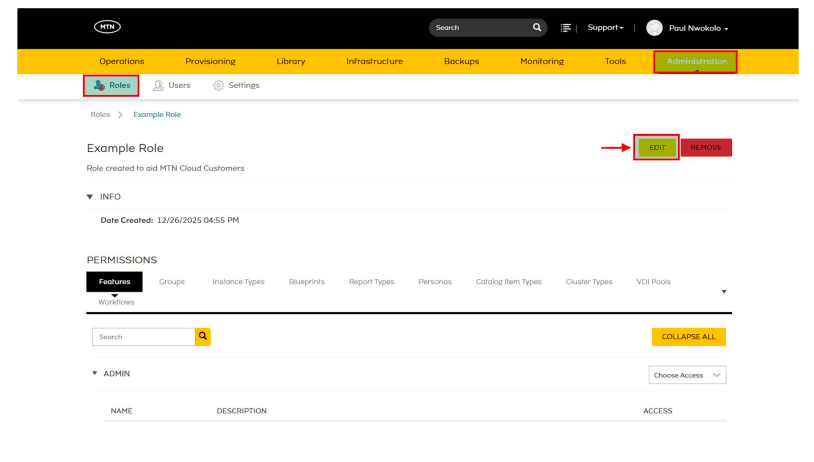
- On the same page, features are listed. Clicking a feature displays a dropdown of permissions, which can be configured as Full, Read, User, or None.
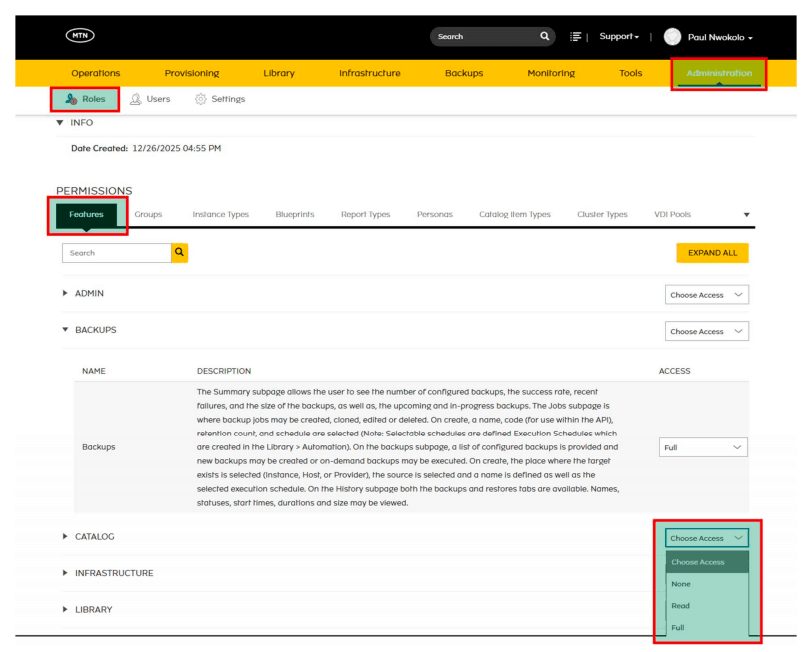
For certain features, only limited options are available — such as Full and None, or Full, User, and None.
Roles can be deleted in two ways:
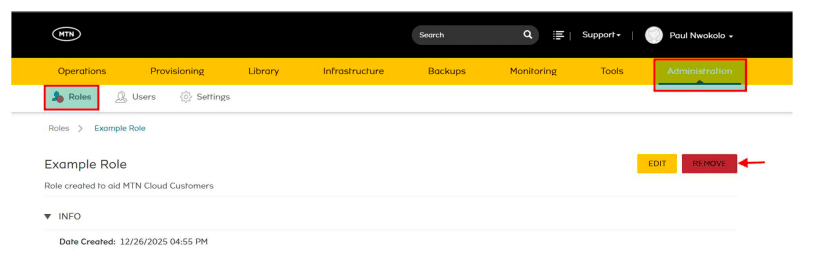
REMOVE Button – Select the role, then click the REMOVE button to delete it.
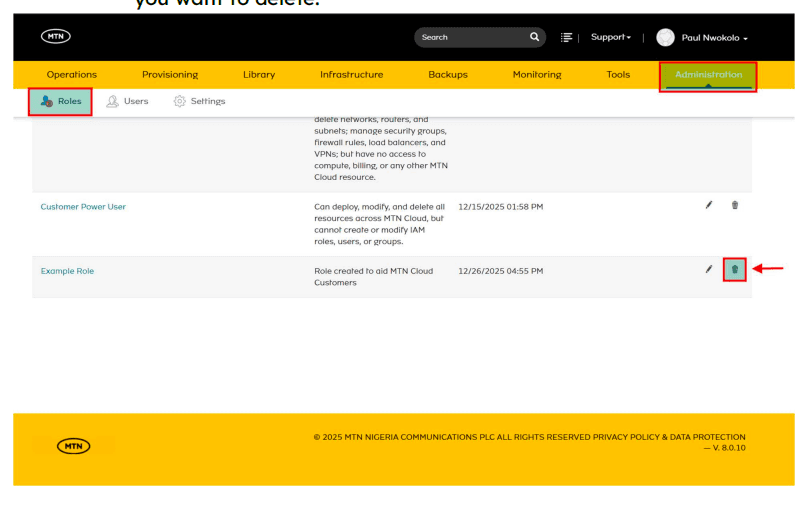
Trash Icon – From the roles list, click the trash icon next to the role you want to delete.
IMPORTANT NOTE: It is strongly recommended not to delete the predefined MTN Cloud roles. Once deleted, these roles cannot be recovered.
Users
An individual account within the system that belongs to a specific Tenant (an isolated environment). Each user represents a person who requires access to MTN Cloud resources.
The Right Sequence
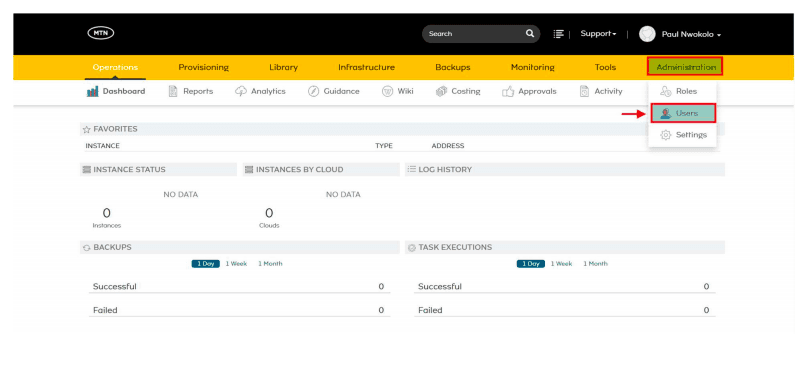
- Accessing Users:— Go to Administration → Users to manage user configurations.
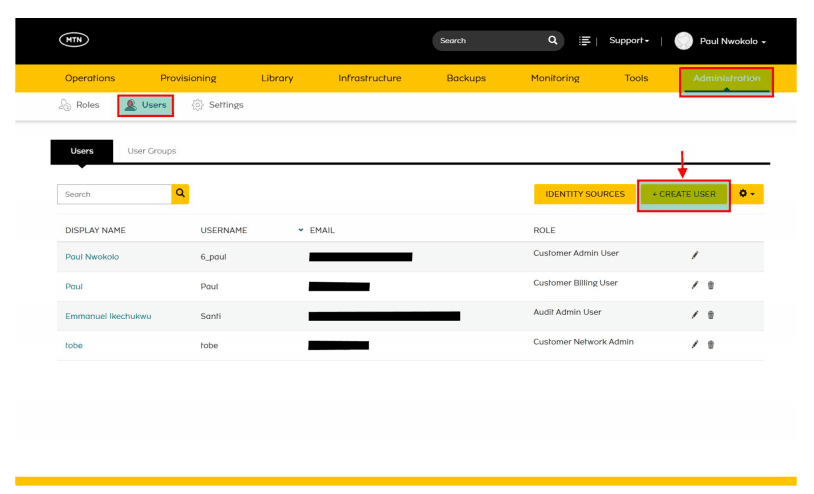
- Create a New User: — Select + CREATE USER to add a new account.
- Role Assignment: Assign one or more roles. When multiple roles are applied, the user automatically inherits the most permissive rights across them, ensuring the highest level of access granted by any assigned role.
Step 1: Navigate to Users
As a Customer Admin User — or any user with equivalent administrative privileges — navigate to the Administration tab.
- Select Users
Step 2: Create Users
- Initiate Creation: Click on + CREATE USER
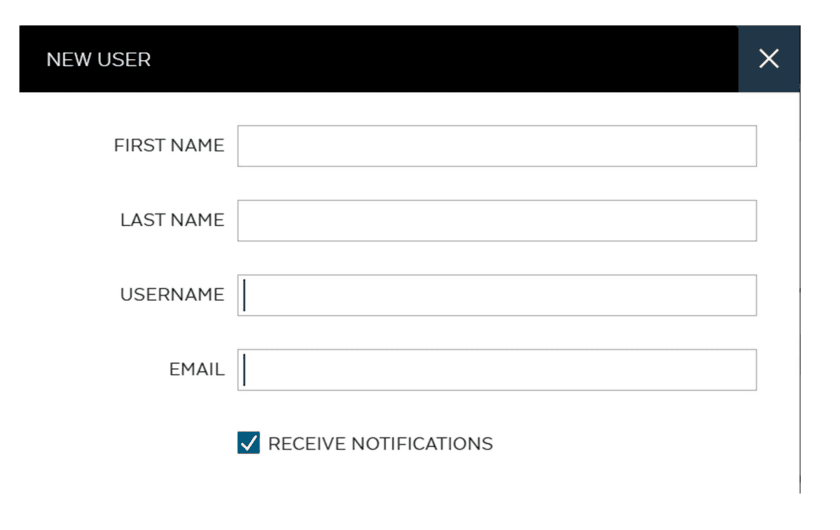
FIRST NAME
LAST NAME
USERNAME
- Assign Role(s): Search and select one or more roles for the user.
- Assign Credentials: Enter a password and re-enter it to confirm for the new user account.
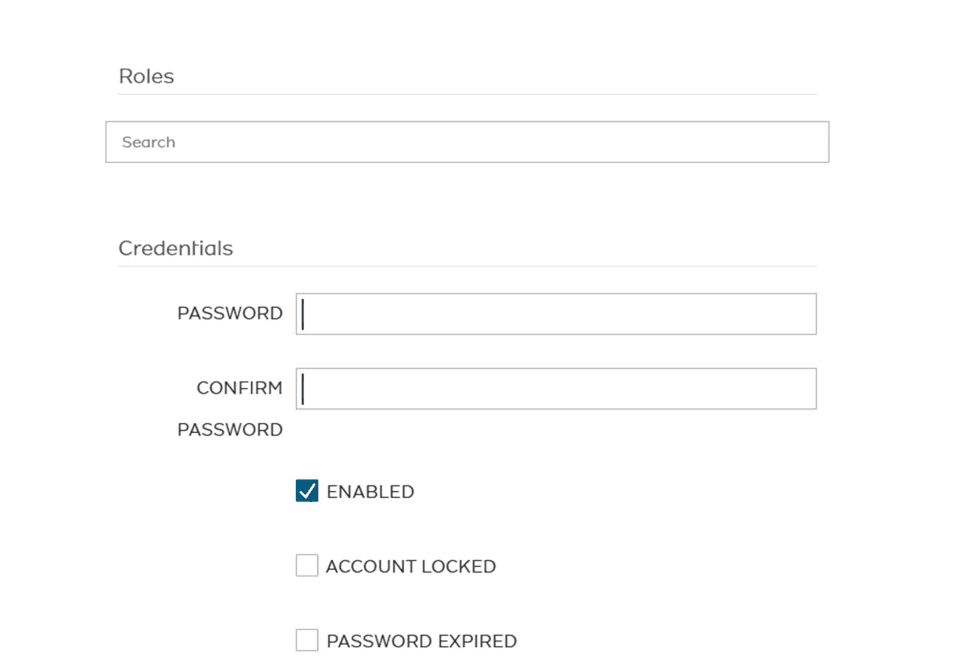
- Enabled - Controls whether the account is active. If unchecked, the user is inactive (greyed out) and cannot log in.
- Account Locked - Indicates the account is blocked due to security failures (e.g., repeated login or 2FA errors). Admins must manually unlock it before the user can log in again.
- Password Expired - Forces the user to set a new password at their next login. The expired password cannot be reused.
On MTN Cloud, the Linux and Windows Settings define how user accounts are automatically created on new instances during provisioning. A Customer Admin User can set these configurations during user creation, but they are optional and are often left for individual users to configure within their own profiles.
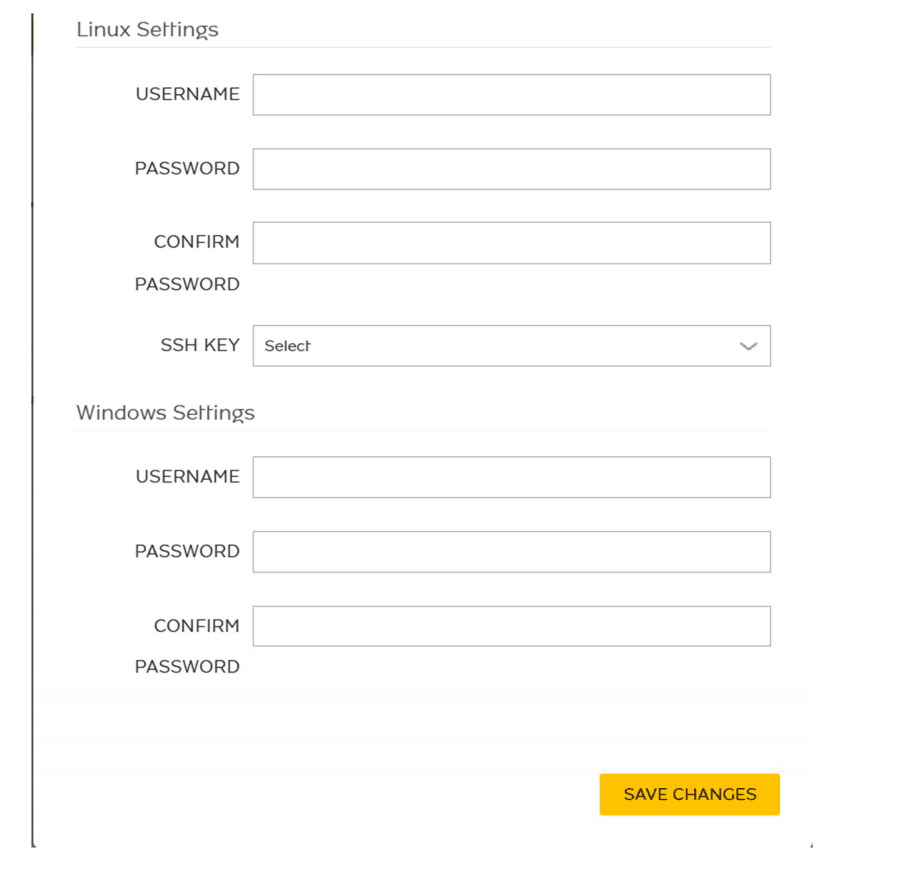
Linux Settings
- Requires a Username, Password, and/or SSH Key-pair.
- Automatically creates a user account on Linux instances.
- If password authentication is disabled or no password is provided, an SSH key must be specified in the user's preferences to allow access.
- Windows Settings
- Manages the Administrator Password for Windows instances.
- During provisioning, the entered value is set as the password for the Windows Administrator account on the new machine.
- Select the Save Changes button to create the user.
Step 3: Configure Users' Details
Managing and maintaining user accounts is a critical phase of the identity lifecycle. On MTN Cloud, you can modify user permissions as job roles change or permanently remove access when it is no longer required.
Editing Users
Customer Admin User — or any user with equivalent administrative privileges can update a user's profile, adjust their resource access, or reset their security settings at any time.
- Accessing the Edit Screen: Navigate to Administration > Users
- Locate the user in the list and select the pencil icon (Edit)
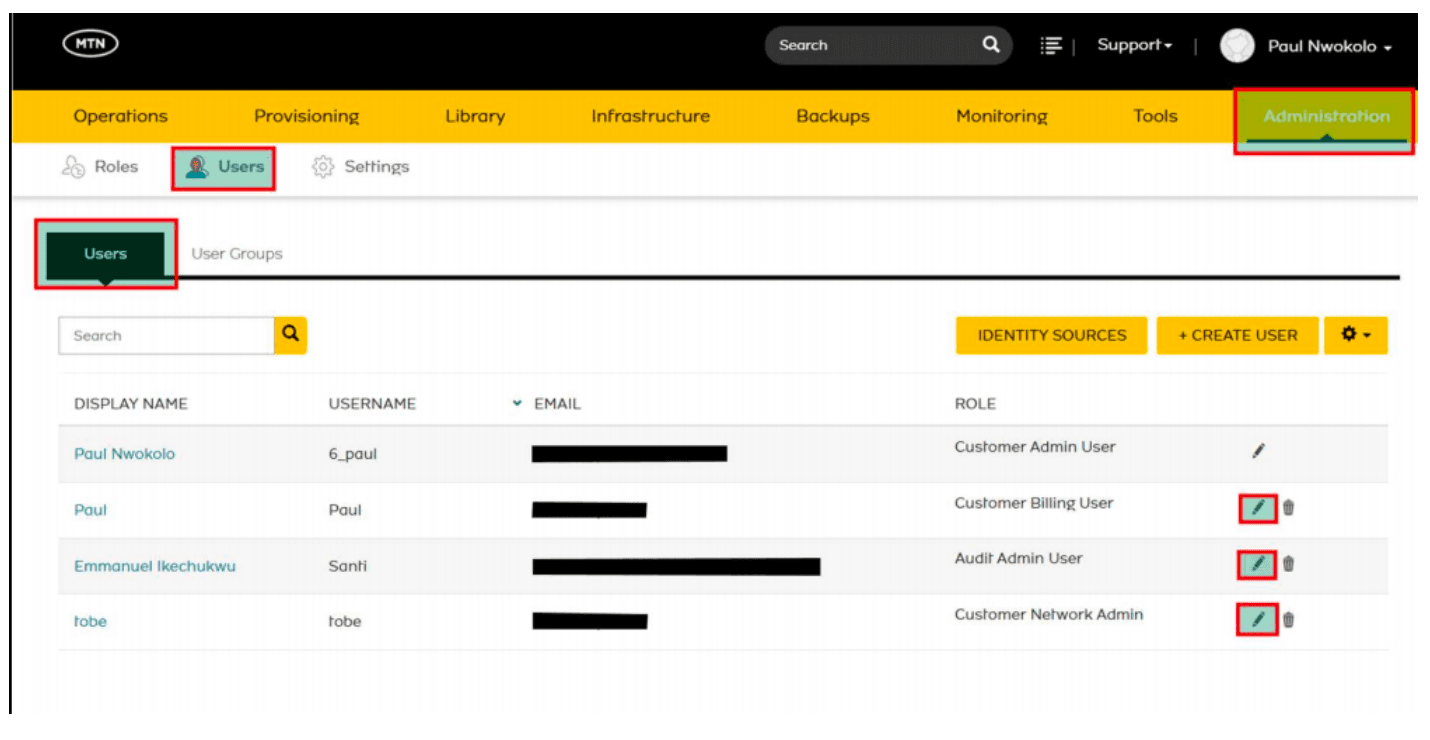
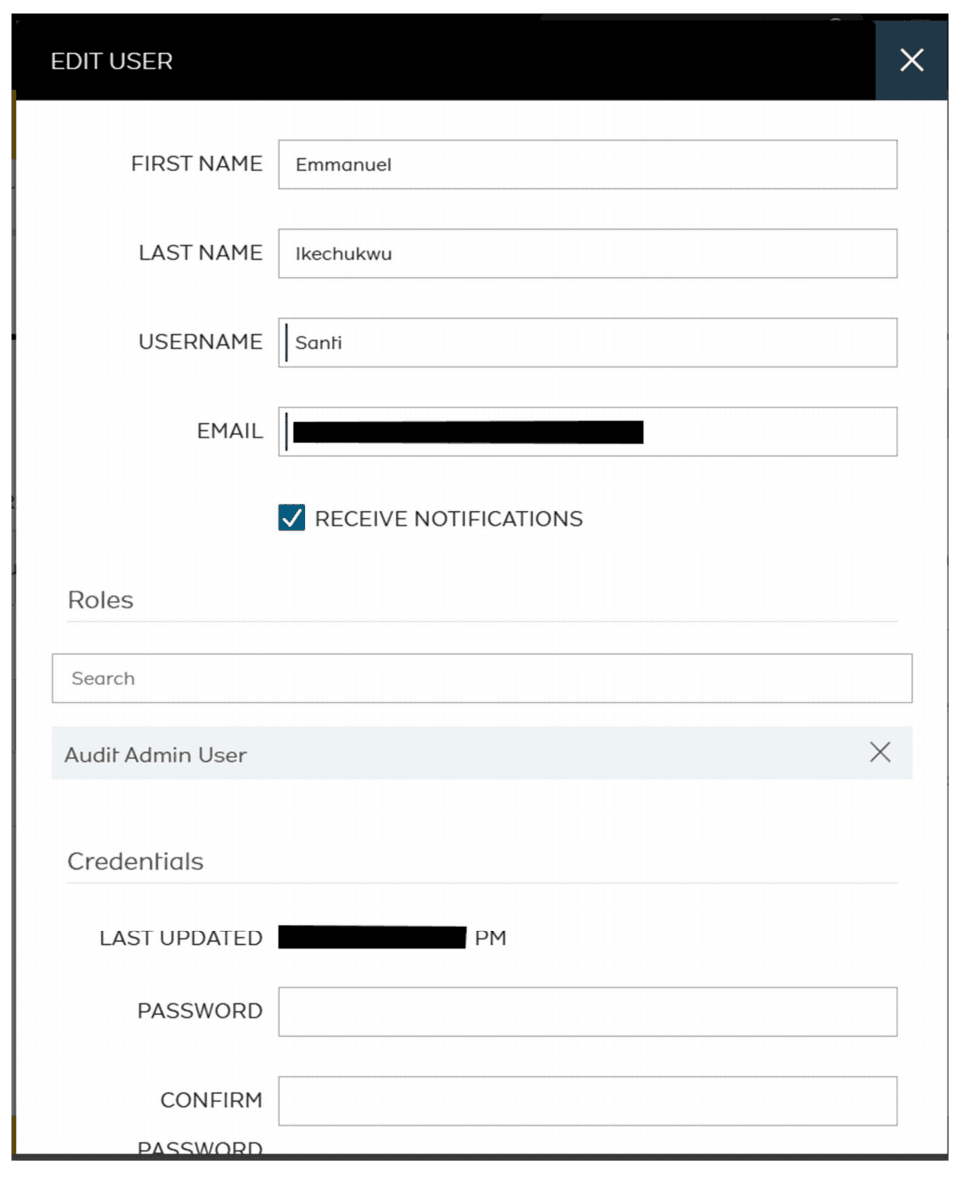
- Modifiable Fields:
- Identity Details: Update names, email addresses, or usernames.
- Role Assignment: Add or remove roles to dynamically change a user's effective permissions.
- Security Controls: Manually lock/unlock accounts, enable/disable them, or trigger a mandatory password reset via the "Password Expired" checkbox.
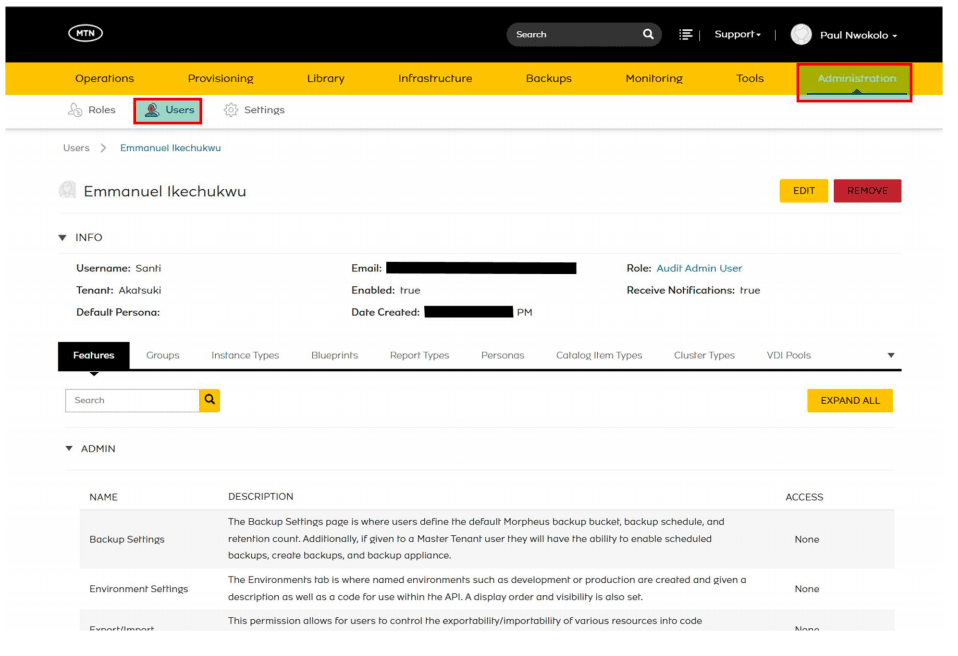
- Permission Review: clicking the user's Display Name allows you to view a detailed breakdown of their "Effective Role Permissions," which is helpful when a user is assigned multiple overlapping roles.
IMPORTANT NOTE: It is strongly recommended not to edit the user assigned the Customer Admin User role. If this role is removed, the user will lose the ability to perform actions related to Users and Roles management on MTN Cloud. Access to these features will only be possible if another account holds the Customer Admin User role or an equivalent role with the required privileges.
Users Deactivation vs. Deletion
- Deactivation (Recommended): Uncheck the Enabled box when editing a user. This makes the account inactive — the user will appear greyed out in the list and cannot log in. However, all historical data and resource ownership remain intact.
- Removal (Permanent): Deleting a user completely removes their account and should be performed with caution, as this action cannot be reversed.
Removing (Deleting) Users
Removing a user permanently revokes their access to MTN Cloud.
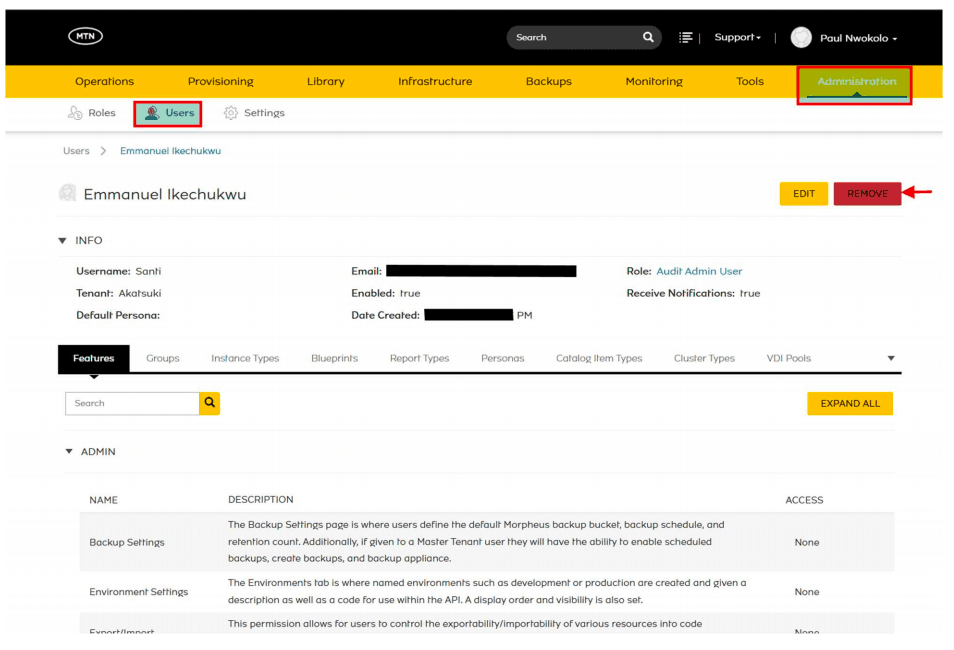
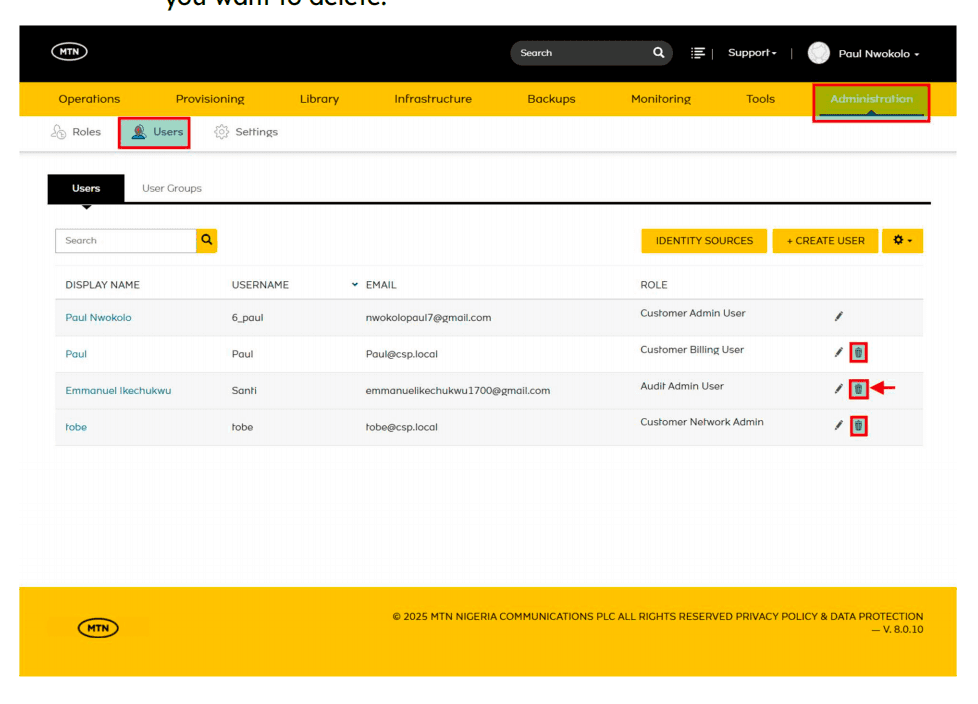
- Users can be deleted in two ways:
Remove Button - Select the user, then click the Remove button to delete it.
Trash Icon - From the users list, click the trash icon next to the user you want to delete.
Congratulations! Your User and Role configuration has been completed. You can now manage access across your tenancy on the MTN Cloud by assigning roles, adjusting permissions, and ensuring users have the appropriate level of control for their responsibilities.